2 编写测试
以下示例简要介绍了在JUnit Jupiter中编写测试的最低要求。本章的后续部分将提供有关所有可用功能的更多详细信息。
import static org.junit.jupiter.api.Assertions.assertEquals;
import example.util.Calculator;
import org.junit.jupiter.api.Test;
class MyFirstJUnitJupiterTests {
    private final Calculator calculator = new Calculator();
    @Test    void addition() {        assertEquals(2, calculator.add(1, 1));    }
}
2.1 注解
JUnit Jupiter支持下列注解,用于配置测试和扩展框架。
除非另有说明,所有核心注解都位于junit-jupiter-api模块中的org.junit.jupiter.api包中。
注解 | 描述 |
|---|---|
@Test | 表示该方法是测试方法。与JUnit 4的@Test注解不同,此注解不声明任何属性,因为JUnit Jupiter中的测试扩展基于其自己的专用注解运行。此类方法可被继承,除非被覆盖。 |
@ParameterizedTest | 表示方法为参数化测试。此类方法可被继承,除非被覆盖。 |
@RepeatedTest | 表示方法是重复测试的测试模板。此类方法可被继承,除非被覆盖。 |
@TestFactory | 表示方法是动态测试的测试工厂。此类方法可被继承,除非被覆盖。 |
@TestTemplate | 表示方法是测试用例的模板,根据注册的提供者返回的调用上下文数量被多次调用。此类方法可被继承,除非被覆盖。 |
@TestClassOrder | 用于配置被注解的测试类中,那些@Nested测试类的执行顺序,此类注解是可继承的。 |
@TestMethodOrder | 用于配置被注解的测试类中,那些测试方法的执行顺序;类似于JUnit 4的@FixMethodOrder。此类注解是可继承的。 |
@TestInstance | 用于配置被注解的测试类的测试实例生命周期。此类注解是可继承的。 |
@DisplayName | 为测试类或测试方法声明自定义显示名称。此类注解是不可继承的。 |
@DisplayNameGeneration | 为测试类声明自定义显示名称生成器。此类注解是可继承的。 |
@BeforeEach | 表示被注解的方法应在当前类中的每个@Test、@RepeatedTest、@ParameterizedTest或@TestFactory的方法之前执行;类似于JUnit 4的@Before。此类方法是可继承的——除非它们被覆盖或取代(即仅根据签名进行替换,而不考虑Java的可见性规则)。 |
@AfterEach | 表示被注解的方法应在当前类中的每个@Test、@RepeatedTest、@ParameterizedTest或@TestFactory的方法之后执行;类似于JUnit 4的@After。此类方法是可继承的——除非它们被覆盖或取代(即仅根据签名进行替换,而不考虑Java的可见性规则)。 |
@BeforeAll | 表示被注解的方法应在当前类中的所有@Test、@RepeatedTest、@ParameterizedTest和@TestFactory方法之前执行;类似于JUnit 4的@BeforeClass。此类方法是可继承的——除非它们被隐藏、覆盖或取代(即仅根据签名进行替换,而不考虑Java的可见性规则)——并且必须是static的,除非使用了“每个类”的测试实例生命周期。 |
@AfterAll | 表示被注解的方法应在当前类中的所有@Test、@RepeatedTest、@ParameterizedTest和@TestFactory方法之后执行;类似于JUnit 4的@AfterClass。此类方法是*可继承的*——除非它们被*隐藏*、*覆盖*或*取代*(即仅根据签名进行替换,而不考虑Java的可见性规则)——并且必须是static`的,除非使用了“每个类”的测试实例生命周期。 |
@Nested | 表示被注解的类是非静态的嵌套测试类。在Java 8到Java 15中,除非使用“每个类”测试实例生命周期,否则不能在@Nested测试类中直接使用@BeforeAll和@AfterAll方法。从Java 16开始,@BeforeAll和@AfterAll方法可以在具有任一测试实例生命周期模式的@Nested测试类中声明为static。此类注解是不可继承的。 |
@Tag | 用于声明过滤测试的标签,可以用在类或方法级别;类似于TestNG中的测试组或JUnit 4中的类别。此类注解在类级别上是可继承的,但在方法级别上是不可继承的。 |
@Disabled | 用于禁用测试类或测试方法;类似于JUnit 4的@Ignore。此类注解是不可继承的。 |
@Timeout | 用于在测试、测试工厂、测试模板或生命周期方法的执行时间超过指定时长时使它们失败。此类注解是可继承的。 |
@ExtendWith | 用于以声明方式注册扩展。此类注解是可继承的。 |
@RegisterExtension | 用于通过字段以编程方式注册扩展。除非这些字段被隐藏,否则它们是可继承的。 |
@TempDir | 用于通过生命周期方法或测试方法中的字段注入或参数注入提供临时目录;位于org.junit.jupiter.api.io包中。 |
2.1.1 元注解和组合注解
JUnit Jupiter注解可用作元注解。这意味着您可以定义自己的组合注解,该注解将自动继承其元注解的语义。
例如,您无需在整个代码库中复制和粘贴@Tag("fast")(请参阅标签和过滤),而是可以按如下方式创建名为@Fast的自定义组合注解。然后可以使用@Fast作为@Tag("fast")的直接替代品。
import java.lang.annotation.ElementType;import java.lang.annotation.Retention;import java.lang.annotation.RetentionPolicy;import java.lang.annotation.Target;
import org.junit.jupiter.api.Tag;
@Target({ ElementType.TYPE, ElementType.METHOD })@Retention(RetentionPolicy.RUNTIME)@Tag("fast")public @interface Fast {}下面的@Test方法演示了@Fast注解的用法。
@Fast@Testvoid myFastTest() { // ...}您甚至可以更进一步,引入自定义@FastTest注解,该注解可用作@Tag("fast")和@Test的替代品。
import java.lang.annotation.ElementType;import java.lang.annotation.Retention;import java.lang.annotation.RetentionPolicy;import java.lang.annotation.Target;
import org.junit.jupiter.api.Tag;import org.junit.jupiter.api.Test;
@Target(ElementType.METHOD)@Retention(RetentionPolicy.RUNTIME)@Tag("fast")@Testpublic @interface FastTest {}JUnit自动将以下内容识别为标有"fast"的@Test方法。
@FastTestvoid myFastTest() { // ...}2.2 定义
平台概念
容器
测试树中的一个节点,包含其他容器或测试作为其子节点(例如一个测试类)。
测试
测试树中的一个节点,用于验证执行时的预期行为(例如一个
@Test方法)。
Jupiter概念
生命周期方法
任何直接或通过元注解被
@BeforeAll、@AfterAll、@BeforeEach或@AfterEach注解的方法。测试类
任何包含至少一个测试方法的顶级类、
static成员类或@Nested类,即容器。测试类不能是abstract的,并且必须有单一的构造器。测试方法
任何直接或通过元注解被
@Test、@RepeatedTest、@ParameterizedTest、@TestFactory或@TestTemplate注解的实例方法。除@Test外,这些方法在测试树中创建一个容器,用于对测试进行分组,或者可能(如@TestFactory)对其他容器进行分组。
2.3 测试类与方法
测试方法和生命周期方法可以在当前测试类中局部声明,也可以从父类继承,或者从接口继承(参见测试接口和默认方法)。此外,测试方法和生命周期方法不能是abstract的,并且不能有返回值(@TestFactory方法除外,这些方法必须有返回值)。
以下测试类演示了如何使用@Test方法和所有受支持的生命周期方法。有关运行时语义的更多信息,请参阅测试执行顺序和回调的包装行为。
import static org.junit.jupiter.api.Assertions.fail;import static org.junit.jupiter.api.Assumptions.assumeTrue;
import org.junit.jupiter.api.AfterAll;import org.junit.jupiter.api.AfterEach;import org.junit.jupiter.api.BeforeAll;import org.junit.jupiter.api.BeforeEach;import org.junit.jupiter.api.Disabled;import org.junit.jupiter.api.Test;
class StandardTests {
    @BeforeAll    static void initAll() {    }
    @BeforeEach    void init() {    }
    @Test    void succeedingTest() {    }
    @Test    void failingTest() {        fail("a failing test");    }
    @Test    @Disabled("for demonstration purposes")    void skippedTest() {        // not executed    }
    @Test    void abortedTest() {        assumeTrue("abc".contains("Z"));        fail("test should have been aborted");    }
    @AfterEach    void tearDown() {    }
    @AfterAll    static void tearDownAll() {    }
}
2.4 显示名称
测试类和测试方法可以通过@DisplayName声明自定义显示名称(包含空格、特殊字符甚至表情符号),这些显示名称将显示在测试报告、测试运行器和IDE中。
import org.junit.jupiter.api.DisplayName;import org.junit.jupiter.api.Test;
@DisplayName("A special test case")class DisplayNameDemo {
    @Test    @DisplayName("Custom test name containing spaces")    void testWithDisplayNameContainingSpaces() {    }
    @Test    @DisplayName("╯°□°)╯")    void testWithDisplayNameContainingSpecialCharacters() {    }
    @Test    @DisplayName("😱")    void testWithDisplayNameContainingEmoji() {    }
}
2.4.1 显示名称生成器
JUnit Jupiter支持自定义显示名称生成器,可通过@DisplayNameGeneration注解进行配置。通过@DisplayName注解提供的值始终优先于DisplayNameGenerator生成的显示名称。
可以通过实现DisplayNameGenerator来创建生成器。以下是Jupiter中可用的一些默认生成器:
| 显示名称生成器 | 行为 |
|---|---|
Standard | 与JUnit Jupiter 5.0发布以来的标准显示名称生成行为相匹配。 |
Simple | 删除没有参数的方法的尾随括号。 |
ReplaceUnderscores | 用空格替换下划线。 |
IndicativeSentences | 通过连接测试和闭包类的名称来生成完整的句子。 |
请注意,对于IndicativeSentences,您可以使用@IndicativeSentencesGeneration自定义分隔符和底层生成器,如下例所示。
import org.junit.jupiter.api.DisplayName;import org.junit.jupiter.api.DisplayNameGeneration;import org.junit.jupiter.api.DisplayNameGenerator;import org.junit.jupiter.api.DisplayNameGenerator.ReplaceUnderscores;import org.junit.jupiter.api.IndicativeSentencesGeneration;import org.junit.jupiter.api.Nested;import org.junit.jupiter.api.Test;import org.junit.jupiter.params.ParameterizedTest;import org.junit.jupiter.params.provider.ValueSource;
class DisplayNameGeneratorDemo {
    @Nested    @DisplayNameGeneration(DisplayNameGenerator.ReplaceUnderscores.class)    class A_year_is_not_supported {
        @Test        void if_it_is_zero() {        }
        @DisplayName("A negative value for year is not supported by the leap year computation.")        @ParameterizedTest(name = "For example, year {0} is not supported.")        @ValueSource(ints = { -1, -4 })        void if_it_is_negative(int year) {        }
    }
    @Nested    @IndicativeSentencesGeneration(separator = " -> ", generator = ReplaceUnderscores.class)    class A_year_is_a_leap_year {
        @Test        void if_it_is_divisible_by_4_but_not_by_100() {        }
        @ParameterizedTest(name = "Year {0} is a leap year.")        @ValueSource(ints = { 2016, 2020, 2048 })        void if_it_is_one_of_the_following_years(int year) {        }
    }
}
+-- DisplayNameGeneratorDemo [OK] +-- A year is not supported [OK] | +-- A negative value for year is not supported by the leap year computation. [OK] | | +-- For example, year -1 is not supported. [OK] | | '-- For example, year -4 is not supported. [OK] | '-- if it is zero() [OK] '-- A year is a leap year [OK] +-- A year is a leap year -> if it is divisible by 4 but not by 100. [OK] '-- A year is a leap year -> if it is one of the following years. [OK] +-- Year 2016 is a leap year. [OK] +-- Year 2020 is a leap year. [OK] '-- Year 2048 is a leap year. [OK]2.4.2 设置默认显示名称生成器
您可以使用junit.jupiter.displayname.generator.default配置参数来指定您希望默认使用的DisplayNameGenerator的完全限定类名。就像通过@DisplayNameGeneration注解配置的显示名称生成器一样,提供的类必须实现DisplayNameGenerator接口。除非闭包的测试类或测试接口上存在@DisplayNameGeneration注解,否则默认显示名称生成器将用于所有测试。通过@DisplayName注解提供的值始终优先于DisplayNameGenerator生成的显示名称。
例如,要默认使用ReplaceUnderscores显示名称生成器,您应该将配置参数设置为相应的完全限定类名(例如,在src/test/resources/junit-platform.properties中):
junit.jupiter.displayname.generator.default = \ org.junit.jupiter.api.DisplayNameGenerator$ReplaceUnderscores类似地,您可以指定任何实现DisplayNameGenerator的自定义类的完全限定名称。
总之,测试类或方法的显示名称根据以下优先规则确定:
@DisplayName注解的值(如果存在)- 通过调用
@DisplayNameGeneration注解中指定的DisplayNameGenerator(如果存在) - 通过调用以参数配置的默认
DisplayNameGenerator(如果存在) - 通过调用
org.junit.jupiter.api.DisplayNameGenerator.Standard
2.5 断言
JUnit Jupiter附带了JUnit 4的许多断言方法,并添加了一些适合与Java 8 lambda一起使用的方法。所有JUnit Jupiter断言都是org.junit.jupiter.api.Assertions类中的静态方法。
import static java.time.Duration.ofMillis;import static java.time.Duration.ofMinutes;import static org.junit.jupiter.api.Assertions.assertAll;import static org.junit.jupiter.api.Assertions.assertEquals;import static org.junit.jupiter.api.Assertions.assertNotNull;import static org.junit.jupiter.api.Assertions.assertThrows;import static org.junit.jupiter.api.Assertions.assertTimeout;import static org.junit.jupiter.api.Assertions.assertTimeoutPreemptively;import static org.junit.jupiter.api.Assertions.assertTrue;
import java.util.concurrent.CountDownLatch;
import example.domain.Person;import example.util.Calculator;
import org.junit.jupiter.api.Tag;import org.junit.jupiter.api.Test;
class AssertionsDemo {
    private final Calculator calculator = new Calculator();
    private final Person person = new Person("Jane", "Doe");
    @Test    void standardAssertions() {        assertEquals(2, calculator.add(1, 1));        assertEquals(4, calculator.multiply(2, 2),                "The optional failure message is now the last parameter");        assertTrue('a' < 'b', () -> "Assertion messages can be lazily evaluated -- "                + "to avoid constructing complex messages unnecessarily.");    }
    @Test    void groupedAssertions() {        // In a grouped assertion all assertions are executed, and all        // failures will be reported together.        assertAll("person",            () -> assertEquals("Jane", person.getFirstName()),            () -> assertEquals("Doe", person.getLastName())        );    }
    @Test    void dependentAssertions() {        // Within a code block, if an assertion fails the        // subsequent code in the same block will be skipped.        assertAll("properties",            () -> {                String firstName = person.getFirstName();                assertNotNull(firstName);
                // Executed only if the previous assertion is valid.                assertAll("first name",                    () -> assertTrue(firstName.startsWith("J")),                    () -> assertTrue(firstName.endsWith("e"))                );            },            () -> {                // Grouped assertion, so processed independently                // of results of first name assertions.                String lastName = person.getLastName();                assertNotNull(lastName);
                // Executed only if the previous assertion is valid.                assertAll("last name",                    () -> assertTrue(lastName.startsWith("D")),                    () -> assertTrue(lastName.endsWith("e"))                );            }        );    }
    @Test    void exceptionTesting() {        Exception exception = assertThrows(ArithmeticException.class, () ->            calculator.divide(1, 0));        assertEquals("/ by zero", exception.getMessage());    }
    @Test    void timeoutNotExceeded() {        // The following assertion succeeds.        assertTimeout(ofMinutes(2), () -> {            // Perform task that takes less than 2 minutes.        });    }
    @Test    void timeoutNotExceededWithResult() {        // The following assertion succeeds, and returns the supplied object.        String actualResult = assertTimeout(ofMinutes(2), () -> {            return "a result";        });        assertEquals("a result", actualResult);    }
    @Test    void timeoutNotExceededWithMethod() {        // The following assertion invokes a method reference and returns an object.        String actualGreeting = assertTimeout(ofMinutes(2), AssertionsDemo::greeting);        assertEquals("Hello, World!", actualGreeting);    }
    @Test    void timeoutExceeded() {        // The following assertion fails with an error message similar to:        // execution exceeded timeout of 10 ms by 91 ms        assertTimeout(ofMillis(10), () -> {            // Simulate task that takes more than 10 ms.            Thread.sleep(100);        });    }
    @Test    void timeoutExceededWithPreemptiveTermination() {        // The following assertion fails with an error message similar to:        // execution timed out after 10 ms        assertTimeoutPreemptively(ofMillis(10), () -> {            // Simulate task that takes more than 10 ms.            new CountDownLatch(1).await();        });    }
    private static String greeting() {        return "Hello, World!";    }
}2.5.1 Kotlin断言支持
JUnit Jupiter还附带了一些非常适合在Kotlin中使用的断言方法。所有JUnit Jupiter Kotlin断言都是org.junit.jupiter.api包中的顶级函数。
import example.domain.Personimport example.util.Calculatorimport org.junit.jupiter.api.Assertions.assertEqualsimport org.junit.jupiter.api.Assertions.assertTrueimport org.junit.jupiter.api.Tagimport org.junit.jupiter.api.Testimport org.junit.jupiter.api.assertAllimport org.junit.jupiter.api.assertDoesNotThrowimport org.junit.jupiter.api.assertThrowsimport org.junit.jupiter.api.assertTimeoutimport org.junit.jupiter.api.assertTimeoutPreemptivelyimport java.time.Duration
class KotlinAssertionsDemo {
    private val person = Person("Jane", "Doe")    private val people = setOf(person, Person("John", "Doe"))
    @Test    fun `exception absence testing`() {        val calculator = Calculator()        val result = assertDoesNotThrow("Should not throw an exception") {            calculator.divide(0, 1)        }        assertEquals(0, result)    }
    @Test    fun `expected exception testing`() {        val calculator = Calculator()        val exception = assertThrows<ArithmeticException> ("Should throw an exception") {            calculator.divide(1, 0)        }        assertEquals("/ by zero", exception.message)    }
    @Test    fun `grouped assertions`() {        assertAll(            "Person properties",            { assertEquals("Jane", person.firstName) },            { assertEquals("Doe", person.lastName) }        )    }
    @Test    fun `grouped assertions from a stream`() {        assertAll(            "People with first name starting with J",            people                .stream()                .map {                    // This mapping returns Stream<() -> Unit>                    { assertTrue(it.firstName.startsWith("J")) }                }        )    }
    @Test    fun `grouped assertions from a collection`() {        assertAll(            "People with last name of Doe",            people.map { { assertEquals("Doe", it.lastName) } }        )    }
    @Test    fun `timeout not exceeded testing`() {        val fibonacciCalculator = FibonacciCalculator()        val result = assertTimeout(Duration.ofMillis(1000)) {            fibonacciCalculator.fib(14)        }        assertEquals(377, result)    }
    @Test    fun `timeout exceeded with preemptive termination`() {        // The following assertion fails with an error message similar to:        // execution timed out after 10 ms        assertTimeoutPreemptively(Duration.ofMillis(10)) {            // Simulate task that takes more than 10 ms.            Thread.sleep(100)        }    }}
2.5.2 第三方断言库
尽管JUnit Jupiter提供的断言功能足以满足许多测试场景的需求,但有时仍需要更多功能和附加功能(例如匹配器)。在这种情况下,JUnit团队建议使用第三方断言库,例如AssertJ、Hamcrest、Truth等。因此,开发人员可以自由使用他们选择的断言库。
例如,匹配器和流式API的组合可用于使断言更具描述性和可读性。但是,JUnit Jupiter的org.junit.jupiter.api.Assertions类不提供assertThat()方法,就像JUnit 4的org.junit.Assert类中接受Hamcrest中Matcher的方法一样。相反,鼓励开发人员使用第三方断言库提供的内置匹配器支持。
以下示例演示了如何在JUnit Jupiter测试中使用Hamcrest的assertThat()支持。只要将Hamcrest库添加到类路径中,您就可以静态导入assertThat()、is()和equalTo()等方法,然后在测试中使用它们,就像下面的assertWithHamcrestMatcher()方法一样。
import static org.hamcrest.CoreMatchers.equalTo;import static org.hamcrest.CoreMatchers.is;import static org.hamcrest.MatcherAssert.assertThat;
import example.util.Calculator;
import org.junit.jupiter.api.Test;
class HamcrestAssertionsDemo {
    private final Calculator calculator = new Calculator();
    @Test    void assertWithHamcrestMatcher() {        assertThat(calculator.subtract(4, 1), is(equalTo(3)));    }
}
当然,基于JUnit 4编程模型的遗留测试可以继续使用org.junit.Assert#assertThat。
2.6 假设
JUnit Jupiter附带了JUnit 4提供的假设方法子集,并添加了一些适合与Java 8 lambda表达式和方法引用一起使用的方法。所有JUnit Jupiter假设都是org.junit.jupiter.api.Assumptions类中的静态方法。
import static org.junit.jupiter.api.Assertions.assertEquals;import static org.junit.jupiter.api.Assumptions.assumeTrue;import static org.junit.jupiter.api.Assumptions.assumingThat;
import example.util.Calculator;
import org.junit.jupiter.api.Test;
class AssumptionsDemo {
    private final Calculator calculator = new Calculator();
    @Test    void testOnlyOnCiServer() {        assumeTrue("CI".equals(System.getenv("ENV")));        // remainder of test    }
    @Test    void testOnlyOnDeveloperWorkstation() {        assumeTrue("DEV".equals(System.getenv("ENV")),            () -> "Aborting test: not on developer workstation");        // remainder of test    }
    @Test    void testInAllEnvironments() {        assumingThat("CI".equals(System.getenv("ENV")),            () -> {                // perform these assertions only on the CI server                assertEquals(2, calculator.divide(4, 2));            });
        // perform these assertions in all environments        assertEquals(42, calculator.multiply(6, 7));    }
}2.7 禁用测试
可以通过@Disabled注解、通过条件测试执行中讨论的注解之一或通过自定义ExecutionCondition来禁用整个测试类或单个测试方法。
这是一个@Disabled的测试类。
import org.junit.jupiter.api.Disabled;import org.junit.jupiter.api.Test;
@Disabled("Disabled until bug #99 has been fixed")class DisabledClassDemo {
    @Test    void testWillBeSkipped() {    }
}这是一个包含@Disabled测试方法的测试类。
import org.junit.jupiter.api.Disabled;import org.junit.jupiter.api.Test;
class DisabledTestsDemo {
    @Disabled("Disabled until bug #42 has been resolved")    @Test    void testWillBeSkipped() {    }
    @Test    void testWillBeExecuted() {    }
}2.8 条件测试执行
JUnit Jupiter中的ExecutionCondition扩展API允许开发人员以编程方式根据某些条件启用或禁用容器或测试。此类条件最简单的示例是内置的DisabledCondition,它支持@Disabled注解(请参阅禁用测试)。除了@Disabled之外,JUnit Jupiter还支持org.junit.jupiter.api.condition包中的其他几个基于注解的条件,允许开发人员以声明方式启用或禁用容器和测试。当注册多个ExecutionCondition扩展时,只要其中一个条件返回禁用,就会禁用容器或测试。如果您希望提供有关禁用原因的详细信息,则与这些内置条件关联的每个注解都有一个disabledReason属性可用于此目的。
有关详细信息,请参阅ExecutionCondition和以下部分。
2.8.1 操作系统与架构条件
可以通过@EnabledOnOs和@DisabledOnOs注解在特定操作系统、架构或两者的组合上启用或禁用容器或测试。
@Test@EnabledOnOs(MAC)void onlyOnMacOs() {    // ...}
@TestOnMacvoid testOnMac() {    // ...}
@Test@EnabledOnOs({ LINUX, MAC })void onLinuxOrMac() {    // ...}
@Test@DisabledOnOs(WINDOWS)void notOnWindows() {    // ...}
@Target(ElementType.METHOD)@Retention(RetentionPolicy.RUNTIME)@Test@EnabledOnOs(MAC)@interface TestOnMac {}@Test@EnabledOnOs(architectures = "aarch64")void onAarch64() { // ...}
@Test@DisabledOnOs(architectures = "x86_64")void notOnX86_64() { // ...}
@Test@EnabledOnOs(value = MAC, architectures = "aarch64")void onNewMacs() { // ...}
@Test@DisabledOnOs(value = MAC, architectures = "aarch64")void notOnNewMacs() { // ...}2.8.2 Java运行时环境条件
可以通过@EnabledOnJre和@DisabledOnJre注解在特定版本的Java运行时环境(JRE)上启用或禁用容器或测试,或通过@EnabledForJreRange和@DisabledForJreRange注解在特定范围的JRE版本上启用或禁用容器或测试。范围默认为JRE.JAVA_8作为下边界(min),JRE.OTHER作为上边界(max),允许使用半开范围。
@Test@EnabledOnJre(JAVA_8)void onlyOnJava8() {    // ...}
@Test@EnabledOnJre({ JAVA_9, JAVA_10 })void onJava9Or10() {    // ...}
@Test@EnabledForJreRange(min = JAVA_9, max = JAVA_11)void fromJava9to11() {    // ...}
@Test@EnabledForJreRange(min = JAVA_9)void fromJava9toCurrentJavaFeatureNumber() {    // ...}
@Test@EnabledForJreRange(max = JAVA_11)void fromJava8To11() {    // ...}
@Test@DisabledOnJre(JAVA_9)void notOnJava9() {    // ...}
@Test@DisabledForJreRange(min = JAVA_9, max = JAVA_11)void notFromJava9to11() {    // ...}
@Test@DisabledForJreRange(min = JAVA_9)void notFromJava9toCurrentJavaFeatureNumber() {    // ...}
@Test@DisabledForJreRange(max = JAVA_11)void notFromJava8to11() {    // ...}
2.8.3 本地镜像条件
可以通过@EnabledInNativeImage和@DisabledInNativeImage注解在GraalVM本地镜像中启用或禁用容器或测试。这些注解通常在使用GraalVM Native Build Tools项目中的Gradle和Maven插件在本地镜像中运行测试时使用。
@Test@EnabledInNativeImagevoid onlyWithinNativeImage() {    // ...}
@Test@DisabledInNativeImagevoid neverWithinNativeImage() {    // ...}
2.8.4 系统属性条件
可以通过@EnabledIfSystemProperty和@DisabledIfSystemProperty注解根据named指定的JVM系统属性来启用或禁用容器或测试。通过matches属性指定的值将被解释为正则表达式。
@Test@EnabledIfSystemProperty(named = "os.arch", matches = ".*64.*")void onlyOn64BitArchitectures() {    // ...}
@Test@DisabledIfSystemProperty(named = "ci-server", matches = "true")void notOnCiServer() { // ...}2.8.5 环境变量条件
可以通过@EnabledIfEnvironmentVariable和@DisabledIfEnvironmentVariable注解,根据由named指定的来自底层操作系统的环境变量的值以启用或禁用容器或测试。通过matches属性提供的值将被解释为正则表达式。
@Test@EnabledIfEnvironmentVariable(named = "ENV", matches = "staging-server")void onlyOnStagingServer() {    // ...}
@Test@DisabledIfEnvironmentVariable(named = "ENV", matches = ".*development.*")void notOnDeveloperWorkstation() {    // ...}
从JUnit Jupiter 5.6开始,@EnabledIfEnvironmentVariable和@DisabledIfEnvironmentVariable是可重复注解。因此,这些注解可以在测试接口、测试类或测试方法上声明多次。具体来说,如果这些注解在给定元素上直接存在、间接存在或元存在,则会找到它们。
2.8.6 自定义条件
作为实现ExecutionCondition的替代方法,可以根据通过@EnabledIf和@DisabledIf注解配置的条件方法启用或禁用容器或测试。条件方法必须具有boolean返回类型,并且可以不接受任何参数或接受单个ExtensionContext参数。
下面的测试类演示了如何通过@EnabledIf和@DisabledIf配置名为customCondition的局部方法。
@Test@EnabledIf("customCondition")void enabled() {    // ...}
@Test@DisabledIf("customCondition")void disabled() {    // ...}
boolean customCondition() { return true;}或者,条件方法可以位于测试类之外。在这种情况下,必须通过其完全限定名称来引用它,如以下示例所示。
package example;
import org.junit.jupiter.api.Test;import org.junit.jupiter.api.condition.EnabledIf;
class ExternalCustomConditionDemo {
    @Test    @EnabledIf("example.ExternalCondition#customCondition")    void enabled() {        // ...    }
}
class ExternalCondition {
    static boolean customCondition() {        return true;    }
}2.9 标记与过滤
测试类和方法可以通过@Tag注解进行标记。这些标记稍后可用于过滤测试发现和执行。有关JUnit平台中标记支持的更多信息,请参阅标记部分。
import org.junit.jupiter.api.Tag;import org.junit.jupiter.api.Test;
@Tag("fast")@Tag("model")class TaggingDemo {
    @Test    @Tag("taxes")    void testingTaxCalculation() {    }
}2.10 测试执行顺序
默认情况下,测试类和方法将使用确定性但故意不明显的算法进行排序。这可确保测试套件的后续运行以相同顺序执行测试类和测试方法,从而实现可重复的构建。
2.10.1 方法顺序
虽然真正的单元测试通常不应该依赖于它们的执行顺序,但有时需要强制执行特定的测试方法执行顺序——例如,在编写集成测试或功能测试时,测试的顺序很重要,尤其是与@TestInstance(Lifecycle.PER_CLASS)结合使用时。
要控制测试方法的执行顺序,请使用@TestMethodOrder注解您的测试类或测试接口,并指定所需的MethodOrderer实现。您可以实现自己的自定义MethodOrderer,也可以使用以下内置MethodOrderer实现之一。
MethodOrderer.DisplayName:根据测试方法的显示名称按字母顺序对其进行排序(参见显示名称生成优先规则)。MethodOrderer.MethodName:根据测试方法的名称和形式参数列表按字母顺序对其进行排序。MethodOrderer.OrderAnnotation:根据通过@Order注解指定的数字顺序对测试方法进行排序。MethodOrderer.Random:对测试方法进行伪随机排序,并支持配置自定义种子。MethodOrderer.Alphanumeric:根据测试方法的名称和形式参数列表按字母顺序对其进行排序;已弃用,改用MethodOrderer.MethodName,并将在6.0中删除。
下面的示例说明如何保证测试方法按照@Order注解指定的顺序执行。
import org.junit.jupiter.api.MethodOrderer.OrderAnnotation;import org.junit.jupiter.api.Order;import org.junit.jupiter.api.Test;import org.junit.jupiter.api.TestMethodOrder;
@TestMethodOrder(OrderAnnotation.class)class OrderedTestsDemo {
    @Test    @Order(1)    void nullValues() {        // perform assertions against null values    }
    @Test    @Order(2)    void emptyValues() {        // perform assertions against empty values    }
    @Test    @Order(3)    void validValues() {        // perform assertions against valid values    }
}
设置默认方法排序器
您可以使用junit.jupiter.testmethod.order.default配置参数来指定您希望默认使用的MethodOrderer的完全限定类名。就像通过@TestMethodOrder注解配置的排序器一样,提供的类必须实现MethodOrderer接口。除非封闭的测试类或测试接口上存在@TestMethodOrder注解,否则默认排序器将用于所有测试。
例如,要默认使用MethodOrderer.OrderAnnotation方法排序器,您应该将配置参数设置为相应的完全限定类名(例如,在src/test/resources/junit-platform.properties中):
junit.jupiter.testmethod.order.default = \ org.junit.jupiter.api.MethodOrderer$OrderAnnotation类似地,您可以指定实现MethodOrderer的任何自定义类的完全限定名称。
2.10.2 类顺序
虽然测试类通常不应依赖于其执行顺序,但有时需要强制执行特定的测试类执行顺序。您可能希望以随机顺序执行测试类,以确保测试类之间没有意外的依赖关系,或者您可能希望按以下场景概述的顺序执行测试类以优化构建时间。
- 首先运行之前失败的测试和更快的测试:“快速失败”模式
- 启用并行执行后,首先安排较长的测试:“最短测试计划执行持续时间”模式
- 其他各种用例
要为整个测试套件全局配置测试类执行顺序,请使用junit.jupiter.testclass.order.default配置参数指定要使用的ClassOrderer的完全限定类名。提供的类必须实现ClassOrderer接口。
您可以实现自己的自定义ClassOrderer或使用以下内置ClassOrderer实现之一。
ClassOrderer.ClassName:根据测试类的完全限定类名按字母顺序对其进行排序。ClassOrderer.DisplayName:根据测试类的显示名称按字母顺序对其进行排序(参见显示名称生成优先规则)。ClassOrderer.OrderAnnotation:根据通过@Order注解指定的数字顺序对测试类进行排序。ClassOrderer.Random:对测试类进行伪随机排序,并支持配置自定义种子。
例如,为了在测试类上使用@Order注解,您应该使用具有相应完全限定类名的配置参数来配置ClassOrderer.OrderAnnotation类排序器(例如,在src/test/resources/junit-platform.properties中):
junit.jupiter.testclass.order.default = \ org.junit.jupiter.api.ClassOrderer$OrderAnnotation配置的ClassOrderer将应用于所有顶级测试类(包括static嵌套测试类)和@Nested测试类。
要为@Nested测试类局部配置测试类执行顺序,请在要排序的@Nested测试类的封闭类上声明@TestClassOrder注解,并提供对要在@TestClassOrder注解中直接使用的ClassOrderer实现的类引用。配置的ClassOrderer将递归应用于@Nested测试类及其@Nested测试类。请注意,局部@TestClassOrder声明始终会覆盖继承的@TestClassOrder声明或通过junit.jupiter.testclass.order.default配置参数全局配置的ClassOrderer。
下面的示例说明如何保证@Nested测试类按照通过@Order注解指定的顺序执行。
import org.junit.jupiter.api.ClassOrderer;import org.junit.jupiter.api.Nested;import org.junit.jupiter.api.Order;import org.junit.jupiter.api.Test;import org.junit.jupiter.api.TestClassOrder;
@TestClassOrder(ClassOrderer.OrderAnnotation.class)class OrderedNestedTestClassesDemo {
    @Nested    @Order(1)    class PrimaryTests {
        @Test        void test1() {        }    }
    @Nested    @Order(2)    class SecondaryTests {
        @Test        void test2() {        }    }}
2.11 测试实例生命周期
为了允许单独执行各个测试方法,并避免由于测试实例状态可变而导致的意外副作用,JUnit在执行每个测试方法之前会为每个测试类创建一个新实例(请参阅定义)。此“每个方法”测试实例生命周期是JUnit Jupiter中的默认行为,与JUnit的所有先前版本类似。
如果您希望JUnit Jupiter在同一个测试实例上执行所有测试方法,请使用@TestInstance(Lifecycle.PER_CLASS)注解您的测试类。使用此模式时,每个测试类将创建一个新的测试实例。因此,如果您的测试方法依赖于存储在实例变量中的状态,您可能需要在@BeforeEach或@AfterEach方法中重置该状态。
“每个类”模式比默认的“每个方法”模式还有一些额外的好处。具体来说,使用“每个类”模式,可以在非静态方法以及接口默认方法上声明@BeforeAll和@AfterAll。因此,“每个类”模式还可以在@Nested测试类中使用@BeforeAll和@AfterAll方法。
从Java 16开始,@BeforeAll和@AfterAll方法可以在@Nested测试类中声明为static的。
如果您使用Kotlin编程语言编写测试,您可能还会发现通过切换到“每个类”测试实例生命周期模式可以更轻松地实现非静态@BeforeAll和@AfterAll生命周期方法以及@MethodSource工厂方法。
2.11.1 更改默认测试实例生命周期
如果测试类或测试接口未使用@TestInstance注解,JUnit Jupiter将使用默认生命周期模式。标准默认模式为PER_METHOD;但是,可以更改整个测试计划执行的默认模式。要更改默认测试实例生命周期模式,请将junit.jupiter.testinstance.lifecycle.default配置参数设置为TestInstance.Lifecycle中定义的枚举常量的名称(忽略大小写)。这可以作为JVM系统属性提供,也可以作为传递给Launcher的LauncherDiscoveryRequest中的配置参数提供,也可以通过JUnit Platform配置文件提供(有关详细信息,请参阅配置参数)。
例如,要将默认测试实例生命周期模式设置为Lifecycle.PER_CLASS,您可以使用以下系统属性启动JVM:
-Djunit.jupiter.testinstance.lifecycle.default=per_class但请注意,通过JUnit Platform配置文件设置默认测试实例生命周期模式是一种更为强大的解决方案,因为配置文件可以与项目一起签入版本控制系统,因此可以在IDE和构建软件中使用。
要通过JUnit Platform配置文件将默认测试实例生命周期模式设置为Lifecycle.PER_CLASS,请在类路径的根目录(例如src/test/resources)中创建一个名为junit-platform.properties的文件,其中包含以下内容:
junit.jupiter.testinstance.lifecycle.default = per_class2.12 嵌套测试
@Nested测试为测试编写者提供了更多表达多组测试之间关系的能力。此类嵌套测试利用了Java的嵌套类,并促进了对测试结构的分层思考。这是一个详细的例子,既有源代码,也有IDE中执行的屏幕截图。
import static org.junit.jupiter.api.Assertions.assertEquals;import static org.junit.jupiter.api.Assertions.assertFalse;import static org.junit.jupiter.api.Assertions.assertThrows;import static org.junit.jupiter.api.Assertions.assertTrue;
import java.util.EmptyStackException;import java.util.Stack;
import org.junit.jupiter.api.BeforeEach;import org.junit.jupiter.api.DisplayName;import org.junit.jupiter.api.Nested;import org.junit.jupiter.api.Test;
@DisplayName("A stack")class TestingAStackDemo {
    Stack<Object> stack;
    @Test    @DisplayName("is instantiated with new Stack()")    void isInstantiatedWithNew() {        new Stack<>();    }
    @Nested    @DisplayName("when new")    class WhenNew {
        @BeforeEach        void createNewStack() {            stack = new Stack<>();        }
        @Test        @DisplayName("is empty")        void isEmpty() {            assertTrue(stack.isEmpty());        }
        @Test        @DisplayName("throws EmptyStackException when popped")        void throwsExceptionWhenPopped() {            assertThrows(EmptyStackException.class, stack::pop);        }
        @Test        @DisplayName("throws EmptyStackException when peeked")        void throwsExceptionWhenPeeked() {            assertThrows(EmptyStackException.class, stack::peek);        }
        @Nested        @DisplayName("after pushing an element")        class AfterPushing {
            String anElement = "an element";
            @BeforeEach            void pushAnElement() {                stack.push(anElement);            }
            @Test            @DisplayName("it is no longer empty")            void isNotEmpty() {                assertFalse(stack.isEmpty());            }
            @Test            @DisplayName("returns the element when popped and is empty")            void returnElementWhenPopped() {                assertEquals(anElement, stack.pop());                assertTrue(stack.isEmpty());            }
            @Test            @DisplayName("returns the element when peeked but remains not empty")            void returnElementWhenPeeked() {                assertEquals(anElement, stack.peek());                assertFalse(stack.isEmpty());            }        }    }}
在IDE中执行此示例时,GUI中的测试执行树将类似于下图。
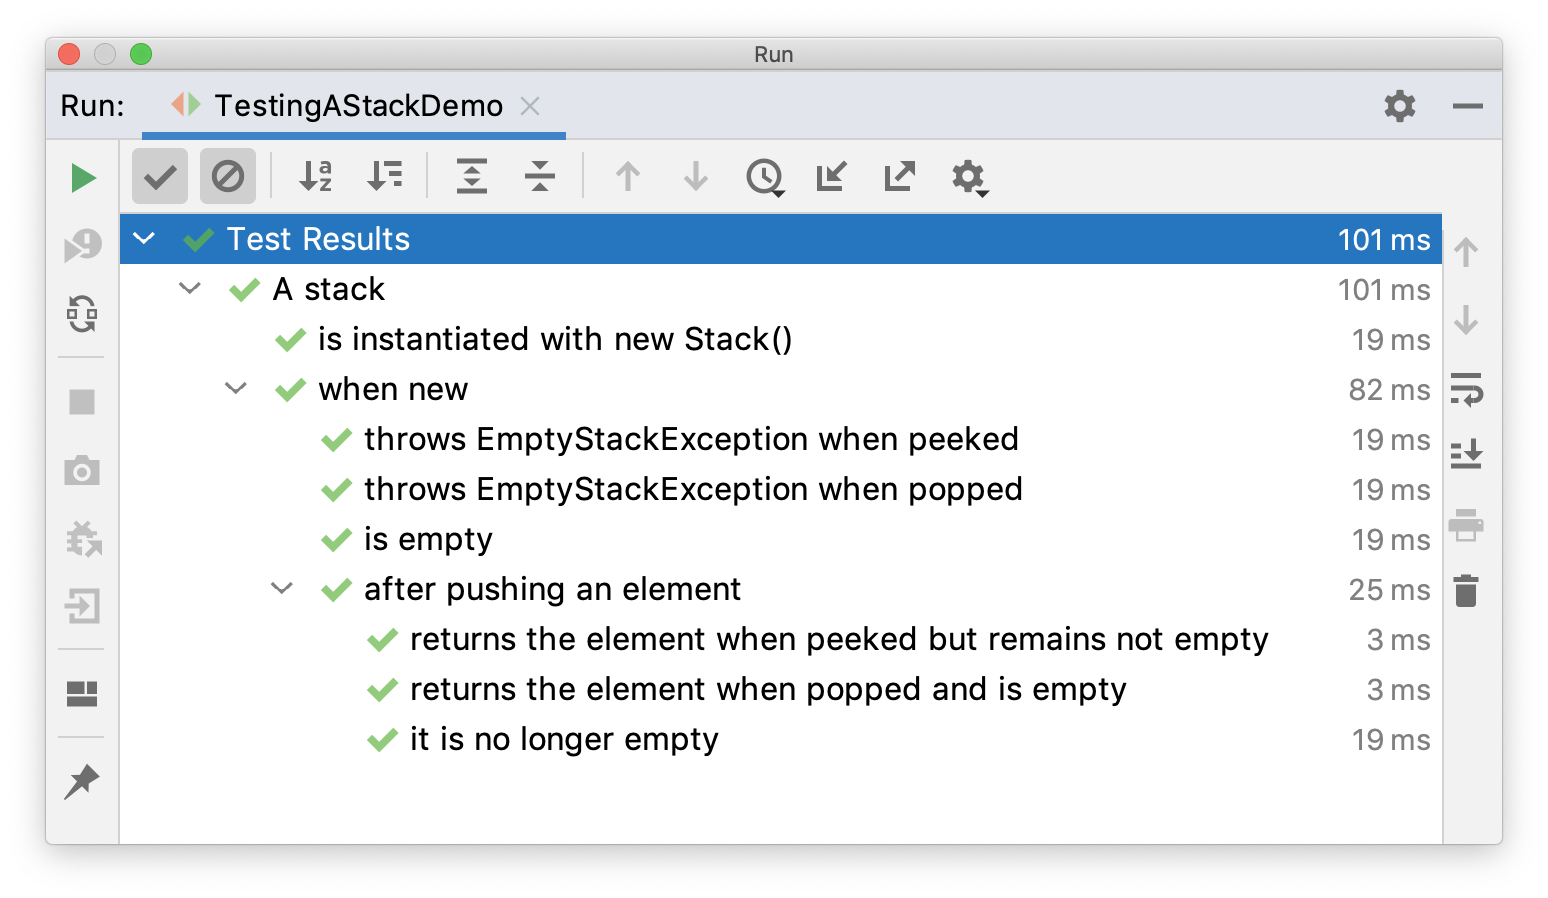
在此示例中,通过为设置代码定义分层生命周期方法,将外部测试的先决条件用于内部测试。例如,createNewStack()是一个@BeforeEach生命周期方法,该方法在定义它的测试类中以及定义它的类下的所有嵌套级别中使用。
外部测试的设置代码在内部测试执行之前运行,这一事实让您能够独立运行所有测试。您甚至可以单独运行内部测试而不运行外部测试,因为外部测试的设置代码始终会执行。
2.13 构造器与方法的依赖注入
在所有之前的JUnit版本中,测试构造器或方法都不允许有参数(至少在标准Runner实现中不允许)。作为JUnit Jupiter的主要变化之一,测试构造器和方法现在都可以有参数。这允许更大的灵活性,并为构造器和方法启用依赖注入。
ParameterResolver为希望在运行时动态解析参数的测试扩展定义了API。如果测试类构造器、测试方法或生命周期方法(参见定义)接受参数,则必须由已注册的ParameterResolver在运行时解析该参数。
目前有三个内置解析器会自动注册。
-
TestInfoParameterResolver:如果构造器或方法参数为TestInfo类型,TestInfoParameterResolver将提供与当前容器或测试对应的TestInfo实例作为参数的值。然后可以使用TestInfo检索有关当前容器或测试的信息,例如显示名称、测试类、测试方法和相关标签。显示名称可以是技术名称(例如测试类或测试方法的名称),也可以是通过@DisplayName配置的自定义名称。TestInfo是JUnit 4中TestName规则的替代品。下面演示了如何将TestInfo注入到测试构造器、@BeforeEach方法和@Test方法中。
import static org.junit.jupiter.api.Assertions.assertEquals;import static org.junit.jupiter.api.Assertions.assertTrue;
import org.junit.jupiter.api.BeforeEach;import org.junit.jupiter.api.DisplayName;import org.junit.jupiter.api.Tag;import org.junit.jupiter.api.Test;import org.junit.jupiter.api.TestInfo;
@DisplayName("TestInfo Demo")class TestInfoDemo {
    TestInfoDemo(TestInfo testInfo) {        assertEquals("TestInfo Demo", testInfo.getDisplayName());    }
    @BeforeEach    void init(TestInfo testInfo) {        String displayName = testInfo.getDisplayName();        assertTrue(displayName.equals("TEST 1") || displayName.equals("test2()"));    }
    @Test    @DisplayName("TEST 1")    @Tag("my-tag")    void test1(TestInfo testInfo) {        assertEquals("TEST 1", testInfo.getDisplayName());        assertTrue(testInfo.getTags().contains("my-tag"));    }
    @Test    void test2() {    }
}RepetitionExtension:如果@RepeatedTest、@BeforeEach或@AfterEach方法中的方法参数属于RepetitionInfo类型,则RepetitionExtension将提供RepetitionInfo的实例。然后可以使用RepetitionInfo检索有关当前重复、重复总次数、失败的重复次数以及相应@RepeatedTest的失败阈值的信息。但请注意,RepetitionExtension未在@RepeatedTest上下文之外注册。请参阅重复测试示例。TestReporterParameterResolver:如果构造器或方法参数属于TestReporter类型,TestReporterParameterResolver将提供TestReporter实例。TestReporter可用于发布有关当前测试运行的其他数据。可以通过TestExecutionListener中的reportingEntryPublished()方法使用这些数据,从而可以在IDE中查看这些数据或将其包含在报告中。 在JUnit Jupiter中,您应该使用TestReporter,而JUnit 4中您曾经使用TestReporter将信息打印到stdout或stderr。使用@RunWith(JUnitPlatform.class)会将所有报告条目输出到stdout。此外,一些IDE会将报告条目打印到stdout或将其显示在用户界面上以获取测试结果。
class TestReporterDemo {
    @Test    void reportSingleValue(TestReporter testReporter) {        testReporter.publishEntry("a status message");    }
    @Test    void reportKeyValuePair(TestReporter testReporter) {        testReporter.publishEntry("a key", "a value");    }
    @Test    void reportMultipleKeyValuePairs(TestReporter testReporter) {        Map<String, String> values = new HashMap<>();        values.put("user name", "dk38");        values.put("award year", "1974");
        testReporter.publishEntry(values);    }
}查看RandomParametersExtension以获取自定义ParameterResolver的示例。虽然它不打算投入生产,但它展示了扩展模型和参数解析过程的简单性和表现力。MyRandomParametersTest演示了如何将随机值注入@Test方法。
@ExtendWith(RandomParametersExtension.class)class MyRandomParametersTest {
    @Test    void injectsInteger(@Random int i, @Random int j) {        assertNotEquals(i, j);    }
    @Test    void injectsDouble(@Random double d) {        assertEquals(0.0, d, 1.0);    }
}对于实际用例,请查看MockitoExtension和SpringExtension的源代码。
当要注入的参数类型是ParameterResolver的唯一条件时,您可以使用泛型的TypeBasedParameterResolver基类。supportsParameters方法在后台实现,支持参数化类型。
2.14 测试接口与默认方法
JUnit Jupiter允许在接口默认方法上声明@Test、@RepeatedTest、@ParameterizedTest、@TestFactory、@TestTemplate、@BeforeEach和@AfterEach。@BeforeAll和@AfterAll既可以在测试接口中的静态方法上声明,也可以在接口默认方法上声明(如果测试接口或测试类使用@TestInstance(Lifecycle.PER_CLASS)注解的话)(请参阅测试实例生命周期)。以下是一些示例。
@TestInstance(Lifecycle.PER_CLASS)interface TestLifecycleLogger {
    static final Logger logger = Logger.getLogger(TestLifecycleLogger.class.getName());
    @BeforeAll    default void beforeAllTests() {        logger.info("Before all tests");    }
    @AfterAll    default void afterAllTests() {        logger.info("After all tests");    }
    @BeforeEach    default void beforeEachTest(TestInfo testInfo) {        logger.info(() -> String.format("About to execute [%s]",            testInfo.getDisplayName()));    }
    @AfterEach    default void afterEachTest(TestInfo testInfo) {        logger.info(() -> String.format("Finished executing [%s]",            testInfo.getDisplayName()));    }
}
interface TestInterfaceDynamicTestsDemo {
@TestFactory default Stream<DynamicTest> dynamicTestsForPalindromes() { return Stream.of("racecar", "radar", "mom", "dad") .map(text -> dynamicTest(text, () -> assertTrue(isPalindrome(text)))); }
}可以在测试接口上声明@ExtendWith和@Tag,以便实现该接口的类自动继承其标签和扩展。有关TimingExtension的源代码,请参阅测试执行前后回调。
@Tag("timed")@ExtendWith(TimingExtension.class)interface TimeExecutionLogger {}然后,您可以在测试类中实现这些测试接口以应用它们。
class TestInterfaceDemo implements TestLifecycleLogger,        TimeExecutionLogger, TestInterfaceDynamicTestsDemo {
    @Test    void isEqualValue() {        assertEquals(1, "a".length(), "is always equal");    }
}运行TestInterfaceDemo会产生类似以下内容的输出:
INFO example.TestLifecycleLogger - Before all testsINFO example.TestLifecycleLogger - About to execute [dynamicTestsForPalindromes()]INFO example.TimingExtension - Method [dynamicTestsForPalindromes] took 19 ms.INFO example.TestLifecycleLogger - Finished executing [dynamicTestsForPalindromes()]INFO example.TestLifecycleLogger - About to execute [isEqualValue()]INFO example.TimingExtension - Method [isEqualValue] took 1 ms.INFO example.TestLifecycleLogger - Finished executing [isEqualValue()]INFO example.TestLifecycleLogger - After all tests此功能的另一个可能的应用是编写接口契约测试。例如,您可以编写测试来测试Object.equals或Comparable.compareTo的实现应如何运行,如下所示。
public interface Testable<T> {
    T createValue();
}
public interface EqualsContract<T> extends Testable<T> {
T createNotEqualValue();
@Test default void valueEqualsItself() { T value = createValue(); assertEquals(value, value); }
@Test default void valueDoesNotEqualNull() { T value = createValue(); assertFalse(value.equals(null)); }
@Test default void valueDoesNotEqualDifferentValue() { T value = createValue(); T differentValue = createNotEqualValue(); assertNotEquals(value, differentValue); assertNotEquals(differentValue, value); }
}public interface ComparableContract<T extends Comparable<T>> extends Testable<T> {
T createSmallerValue();
@Test default void returnsZeroWhenComparedToItself() { T value = createValue(); assertEquals(0, value.compareTo(value)); }
@Test default void returnsPositiveNumberWhenComparedToSmallerValue() { T value = createValue(); T smallerValue = createSmallerValue(); assertTrue(value.compareTo(smallerValue) > 0); }
@Test default void returnsNegativeNumberWhenComparedToLargerValue() { T value = createValue(); T smallerValue = createSmallerValue(); assertTrue(smallerValue.compareTo(value) < 0); }
}然后,您可以在测试类中实现这两个契约接口,从而继承相应的测试。当然,您必须实现抽象方法。
class StringTests implements ComparableContract<String>, EqualsContract<String> {
    @Override    public String createValue() {        return "banana";    }
    @Override    public String createSmallerValue() {        return "apple"; // 'a' < 'b' in "banana"    }
    @Override    public String createNotEqualValue() {        return "cherry";    }
}2.15 重复测试
JUnit Jupiter通过使用@RepeatedTest注解方法并指定所需的重复次数,提供了按指定次数重复测试的功能。每次调用重复测试的行为都类似于执行常规@Test方法,并完全支持相同的生命周期回调和扩展。
下面的示例说明如何声明一个名为repeatedTest()的测试,该测试将自动重复10次:
@RepeatedTest(10)void repeatedTest() { // ...}自JUnit Jupiter 5.10起,@RepeatedTest可以配置失败阈值,该阈值表示失败次数,超过该次数后将自动跳过剩余的重复。将failureThreshold属性设置为小于总重复次数的正数,以便在遇到指定次数的失败后跳过剩余重复的调用。
例如,如果您使用@RepeatedTest重复调用您怀疑不稳定的测试,一次失败就足以证明该测试不稳定,无需调用其余的重复。要支持该特定用例,请设置failureThreshold = 1。您也可以根据您的用例将阈值设置为大于1的数字。
默认情况下,failureThreshold属性设置为Integer.MAX_VALUE,表示不会应用任何失败阈值,这实际上意味着无论任何重复是否失败,都会调用指定次数的重复。
除了指定重复次数和失败阈值外,还可以通过@RepeatedTest注解的name属性为每次重复配置自定义显示名称。此外,显示名称可以是由静态文本和动态占位符组合而成的模式。目前支持以下占位符:
{displayName}:@RepeatedTest方法的显示名称{currentRepetition}:当前的重复次数{totalRepetitions}:重复的总次数
给定重复的默认显示名称是根据以下模式生成的:"repetition {currentRepetition} of {totalRepetitions}"。因此,上一个repeatTest()示例的各个重复的显示名称将是:repetition 1 of 10、repetition 2 of 10等。如果您希望将@RepeatedTest方法的显示名称包含在每个重复的名称中,您可以定义自己的自定义模式或使用预定义的RepeatedTest.LONG_DISPLAY_NAME模式。后者等于"{displayName} :: repetition {currentRepetition} of {totalRepetitions}",这会导致各个重复的显示名称为repeatTest() :: repetition 1 of 10、repeatedTest() :: repetition 2 of 10等。
为了检索有关当前重复、重复总次数、失败的重复次数以及失败阈值的信息,开发人员可以选择将RepetitionInfo的实例注入到@RepeatedTest、@BeforeEach或@AfterEach方法中。
2.15.1 重复测试示例
本节末尾的RepeatedTestsDemo类演示了几个重复测试的示例。
duplicateTest()方法与上一节中的示例相同;而repeatTestWithRepetitionInfo()演示了如何将RepetitionInfo的实例注入到测试中以访问当前重复测试的总重复次数。
repeatTestWithFailureThreshold()演示了如何设置失败阈值并模拟每重复一次的意外失败。您可以在本节末尾的ConsoleLauncher输出中查看结果行为。
接下来的两种方法演示了如何在每次重复的显示名称中包含@RepeatedTest方法的自定义@DisplayName。customDisplayName()将自定义显示名称与自定义模式相结合,然后使用TestInfo验证生成的显示名称的格式。Repeat!是来自@DisplayName声明的{displayName},1/1来自{currentRepetition}/{totalRepetitions}。相比之下,customDisplayNameWithLongPattern()使用前面提到的预定义RepeatedTest.LONG_DISPLAY_NAME模式。
repeatedTestInGerman()演示了将重复测试的显示名称翻译成外语的能力——在本例中为德语,从而得到单个重复的名称,例如:Wiederholung 1 von 5、Wiederholung 2 von 5等。
由于beforeEach()方法带有@BeforeEach注解,因此它将在每个重复测试的每次重复之前执行。通过将TestInfo和RepetitionInfo注入到该方法中,我们发现可以获取有关当前正在执行的重复测试的信息。在启用INFO日志级别的情况下执行RepeatedTestsDemo会产生以下输出。
INFO: About to execute repetition 1 of 10 for repeatedTestINFO: About to execute repetition 2 of 10 for repeatedTestINFO: About to execute repetition 3 of 10 for repeatedTestINFO: About to execute repetition 4 of 10 for repeatedTestINFO: About to execute repetition 5 of 10 for repeatedTestINFO: About to execute repetition 6 of 10 for repeatedTestINFO: About to execute repetition 7 of 10 for repeatedTestINFO: About to execute repetition 8 of 10 for repeatedTestINFO: About to execute repetition 9 of 10 for repeatedTestINFO: About to execute repetition 10 of 10 for repeatedTestINFO: About to execute repetition 1 of 5 for repeatedTestWithRepetitionInfoINFO: About to execute repetition 2 of 5 for repeatedTestWithRepetitionInfoINFO: About to execute repetition 3 of 5 for repeatedTestWithRepetitionInfoINFO: About to execute repetition 4 of 5 for repeatedTestWithRepetitionInfoINFO: About to execute repetition 5 of 5 for repeatedTestWithRepetitionInfoINFO: About to execute repetition 1 of 8 for repeatedTestWithFailureThresholdINFO: About to execute repetition 2 of 8 for repeatedTestWithFailureThresholdINFO: About to execute repetition 3 of 8 for repeatedTestWithFailureThresholdINFO: About to execute repetition 4 of 8 for repeatedTestWithFailureThresholdINFO: About to execute repetition 1 of 1 for customDisplayNameINFO: About to execute repetition 1 of 1 for customDisplayNameWithLongPatternINFO: About to execute repetition 1 of 5 for repeatedTestInGermanINFO: About to execute repetition 2 of 5 for repeatedTestInGermanINFO: About to execute repetition 3 of 5 for repeatedTestInGermanINFO: About to execute repetition 4 of 5 for repeatedTestInGermanINFO: About to execute repetition 5 of 5 for repeatedTestInGermanimport static org.junit.jupiter.api.Assertions.assertEquals;import static org.junit.jupiter.api.Assertions.fail;
import java.util.logging.Logger;
import org.junit.jupiter.api.BeforeEach;import org.junit.jupiter.api.DisplayName;import org.junit.jupiter.api.RepeatedTest;import org.junit.jupiter.api.RepetitionInfo;import org.junit.jupiter.api.TestInfo;
class RepeatedTestsDemo {
private Logger logger = // ...
@BeforeEach void beforeEach(TestInfo testInfo, RepetitionInfo repetitionInfo) { int currentRepetition = repetitionInfo.getCurrentRepetition(); int totalRepetitions = repetitionInfo.getTotalRepetitions(); String methodName = testInfo.getTestMethod().get().getName(); logger.info(String.format("About to execute repetition %d of %d for %s", // currentRepetition, totalRepetitions, methodName)); }
@RepeatedTest(10) void repeatedTest() { // ... }
@RepeatedTest(5) void repeatedTestWithRepetitionInfo(RepetitionInfo repetitionInfo) { assertEquals(5, repetitionInfo.getTotalRepetitions()); }
@RepeatedTest(value = 8, failureThreshold = 2) void repeatedTestWithFailureThreshold(RepetitionInfo repetitionInfo) { // Simulate unexpected failure every second repetition if (repetitionInfo.getCurrentRepetition() % 2 == 0) { fail("Boom!"); } }
@RepeatedTest(value = 1, name = "{displayName} {currentRepetition}/{totalRepetitions}") @DisplayName("Repeat!") void customDisplayName(TestInfo testInfo) { assertEquals("Repeat! 1/1", testInfo.getDisplayName()); }
@RepeatedTest(value = 1, name = RepeatedTest.LONG_DISPLAY_NAME) @DisplayName("Details...") void customDisplayNameWithLongPattern(TestInfo testInfo) { assertEquals("Details... :: repetition 1 of 1", testInfo.getDisplayName()); }
@RepeatedTest(value = 5, name = "Wiederholung {currentRepetition} von {totalRepetitions}") void repeatedTestInGerman() { // ... }
}当使用启用了unicode主题的ConsoleLauncher时,执行RepeatedTestsDemo会导致控制台出现以下输出。
├─ RepeatedTestsDemo ✔│ ├─ repeatedTest() ✔│ │ ├─ repetition 1 of 10 ✔│ │ ├─ repetition 2 of 10 ✔│ │ ├─ repetition 3 of 10 ✔│ │ ├─ repetition 4 of 10 ✔│ │ ├─ repetition 5 of 10 ✔│ │ ├─ repetition 6 of 10 ✔│ │ ├─ repetition 7 of 10 ✔│ │ ├─ repetition 8 of 10 ✔│ │ ├─ repetition 9 of 10 ✔│ │ └─ repetition 10 of 10 ✔│ ├─ repeatedTestWithRepetitionInfo(RepetitionInfo) ✔│ │ ├─ repetition 1 of 5 ✔│ │ ├─ repetition 2 of 5 ✔│ │ ├─ repetition 3 of 5 ✔│ │ ├─ repetition 4 of 5 ✔│ │ └─ repetition 5 of 5 ✔│ ├─ repeatedTestWithFailureThreshold(RepetitionInfo) ✔│ │ ├─ repetition 1 of 8 ✔│ │ ├─ repetition 2 of 8 ✘ Boom!│ │ ├─ repetition 3 of 8 ✔│ │ ├─ repetition 4 of 8 ✘ Boom!│ │ ├─ repetition 5 of 8 ↷ Failure threshold [2] exceeded│ │ ├─ repetition 6 of 8 ↷ Failure threshold [2] exceeded│ │ ├─ repetition 7 of 8 ↷ Failure threshold [2] exceeded│ │ └─ repetition 8 of 8 ↷ Failure threshold [2] exceeded│ ├─ Repeat! ✔│ │ └─ Repeat! 1/1 ✔│ ├─ Details... ✔│ │ └─ Details... :: repetition 1 of 1 ✔│ └─ repeatedTestInGerman() ✔│ ├─ Wiederholung 1 von 5 ✔│ ├─ Wiederholung 2 von 5 ✔│ ├─ Wiederholung 3 von 5 ✔│ ├─ Wiederholung 4 von 5 ✔│ └─ Wiederholung 5 von 5 ✔2.16 参数化测试
参数化测试允许使用不同的参数多次运行测试。它们的声明方式与常规@Test方法相同,但使用@ParameterizedTest注解。此外,您必须声明至少一个源,该源将为每次调用提供参数,然后在测试方法中使用这些参数。
以下示例演示了一个参数化测试,它使用@ValueSource注解指定String数组作为参数的来源。
@ParameterizedTest@ValueSource(strings = { "racecar", "radar", "able was I ere I saw elba" })void palindromes(String candidate) { assertTrue(StringUtils.isPalindrome(candidate));}执行上述参数化测试方法时,每次调用都会单独报告。例如,ConsoleLauncher将打印类似以下内容的输出。
palindromes(String) ✔├─ [1] candidate=racecar ✔├─ [2] candidate=radar ✔└─ [3] candidate=able was I ere I saw elba ✔2.16.1 所需设置
为了使用参数化测试,您需要添加对junit-jupiter-params工件的依赖项。请参阅依赖项元数据了解详细信息。
2.16.2 使用参数
参数化测试方法通常直接从配置的源(参见参数源)使用参数,遵循参数源索引和方法参数索引之间的一一对应关系(参见@CsvSource中的示例)。但是,参数化测试方法也可以选择将源中的参数聚合到传递给方法的单个对象中(参见参数聚合)。ParameterResolver还可以提供其他参数(例如,获取TestInfo、TestReporter等的实例)。具体而言,参数化测试方法必须根据以下规则声明形式参数。
- 必须首先声明零个或多个索引参数。
- 接下来必须声明零个或多个聚合器。
- 最后必须声明零个或多个由
ParameterResolver提供的参数。
在此上下文中,索引参数是ArgumentsProvider提供的Arguments中给定索引的参数,该参数作为参数传递给方法形式参数列表中相同索引处的参数化方法。聚合器是ArgumentsAccessor类型的任何参数或使用@AggregateWith注解的任何参数。
2.16.3 参数源
开箱即用,JUnit Jupiter提供了相当多的源注解。以下每个小节都提供了简要概述和每个注解的示例。请参阅org.junit.jupiter.params.provider包中的Javadoc以获取更多信息。
@ValueSource
@ValueSource是最简单的来源之一。它允许您指定一个字面量数组,并且只能用于为每个参数化测试调用提供一个参数。
@ValueSource支持以下类型的字面量:
shortbyteintlongfloatdoublecharbooleanjava.lang.Stringjava.lang.Class
例如,以下@ParameterizedTest方法将被调用三次,分别为值1、2和3。
@ParameterizedTest@ValueSource(ints = { 1, 2, 3 })void testWithValueSource(int argument) { assertTrue(argument > 0 && argument < 4);}null与空白源
为了检查极端情况并验证我们的软件在提供错误输入时是否能够正确运行,为我们的参数化测试提供null和空白值会很有用。以下注解可作为接受单个参数的参数化测试的null和空值来源。
@NullSource:为带注解的@ParameterizedTest方法提供一个null参数。@NullSource不能用于具有原始类型的参数。
@EmptySource:为带注解的@ParameterizedTest方法提供一个空参数,用于以下类型的参数:java.lang.String、java.util.Collection(以及具有公共无参构造器的具体子类型)、java.util.List、java.util.Set、java.util.SortedSet、java.util.NavigableSet、java.util.Map(以及具有公共无参构造器的具体子类型)、java.util.SortedMap、java.util.NavigableMap、基本类型数组(例如,int[]、char[][]等)、对象数组(例如,String[]、Integer[][]等)。@NullAndEmptySource:一个组合注解,结合了@NullSource和@EmptySource的功能。
如果您需要为参数化测试提供多种不同类型的空白字符串,则可以使用@ValueSource来实现——例如,@ValueSource(strings = {" ", " ", "\t", "\n"})。
您还可以组合使用@NullSource、@EmptySource和@ValueSource来测试更大范围的null、空和空白输入。以下示例演示了如何针对字符串实现此操作。
@ParameterizedTest@NullSource@EmptySource@ValueSource(strings = { " ", " ", "\t", "\n" })void nullEmptyAndBlankStrings(String text) { assertTrue(text == null || text.trim().isEmpty());}利用组合的@NullAndEmptySource注解可以简化上述操作,如下所示。
@ParameterizedTest@NullAndEmptySource@ValueSource(strings = { " ", " ", "\t", "\n" })void nullEmptyAndBlankStrings(String text) { assertTrue(text == null || text.trim().isEmpty());}@EnumSource
@EnumSource提供了一种使用Enum常量的便捷方法。
@ParameterizedTest@EnumSource(ChronoUnit.class)void testWithEnumSource(TemporalUnit unit) { assertNotNull(unit);}注解的value属性是可选的。省略时,将使用第一个方法参数的声明类型。如果测试未引用枚举类型,则测试将失败。因此,上例中value属性是必需的,因为方法参数声明为TemporalUnit,即由ChronoUnit实现的接口,它不是枚举类型。将方法参数类型更改为ChronoUnit允许您从注解中省略显式枚举类型,如下所示。
@ParameterizedTest@EnumSourcevoid testWithEnumSourceWithAutoDetection(ChronoUnit unit) { assertNotNull(unit);}注解提供了一个可选的names属性,可让您指定应使用哪些常量,如下例所示。如果省略,则将使用所有常量。
@ParameterizedTest@EnumSource(names = { "DAYS", "HOURS" })void testWithEnumSourceInclude(ChronoUnit unit) { assertTrue(EnumSet.of(ChronoUnit.DAYS, ChronoUnit.HOURS).contains(unit));}@EnumSource注解还提供了一个可选的mode属性,可以对传递给测试方法的常量进行细粒度控制。例如,您可以从枚举常量池中排除名称,或者指定正则表达式,如以下示例所示。
@ParameterizedTest@EnumSource(mode = EXCLUDE, names = { "ERAS", "FOREVER" })void testWithEnumSourceExclude(ChronoUnit unit) { assertFalse(EnumSet.of(ChronoUnit.ERAS, ChronoUnit.FOREVER).contains(unit));}@ParameterizedTest@EnumSource(mode = MATCH_ALL, names = "^.*DAYS$")void testWithEnumSourceRegex(ChronoUnit unit) { assertTrue(unit.name().endsWith("DAYS"));}@MethodSource
@MethodSource允许您引用测试类或外部类的一个或多个工厂方法。
测试类中的工厂方法必须是static的,除非测试类用@TestInstance(Lifecycle.PER_CLASS)注解;而外部类中的工厂方法必须始终是static的。
每个工厂方法都必须生成一个参数流,并且流中的每组参数都将作为带注解的@ParameterizedTest方法的单独调用的物理参数提供。一般来说,这转换为Arguments的Stream(即 Stream<Arguments>);但是,实际的具体返回类型可以采用多种形式。在这种情况下,“流”是JUnit可以可靠地转换为流的任何内容,例如Stream、DoubleStream、LongStream、IntStream、Collection、Iterator、Iterable、对象数组或基本类型数组。流中的“参数”可以作为Arguments的实例、对象数组(例如Object[])或单个值(如果参数化测试方法接受单个参数的话)提供。
如果只需要一个参数,则可以返回该参数类型的实例Stream,如下面的示例所示。
@ParameterizedTest@MethodSource("stringProvider")void testWithExplicitLocalMethodSource(String argument) {    assertNotNull(argument);}
static Stream<String> stringProvider() { return Stream.of("apple", "banana");}如果您没有通过@MethodSource明确提供工厂方法名称,JUnit Jupiter将按照惯例搜索与当前@ParameterizedTest方法同名的工厂方法。以下示例对此进行了演示。
@ParameterizedTest@MethodSourcevoid testWithDefaultLocalMethodSource(String argument) {    assertNotNull(argument);}
static Stream<String> testWithDefaultLocalMethodSource() { return Stream.of("apple", "banana");}还支持原始类型(DoubleStream、IntStream和LongStream)的流,如以下示例所示。
@ParameterizedTest@MethodSource("range")void testWithRangeMethodSource(int argument) {    assertNotEquals(9, argument);}
static IntStream range() { return IntStream.range(0, 20).skip(10);}如果参数化测试方法声明了多个参数,则需要返回Arguments实例或对象数组的集合、流或数组,如下所示(有关支持的返回类型的更多详细信息,请参阅@MethodSource的Javadoc)。请注意,arguments(Object...)是在Arguments接口中定义的静态工厂方法。此外,Arguments.of(Object...)可用作arguments(Object...)的替代方法。
@ParameterizedTest@MethodSource("stringIntAndListProvider")void testWithMultiArgMethodSource(String str, int num, List<String> list) {    assertEquals(5, str.length());    assertTrue(num >=1 && num <=2);    assertEquals(2, list.size());}
static Stream<Arguments> stringIntAndListProvider() { return Stream.of( arguments("apple", 1, Arrays.asList("a", "b")), arguments("lemon", 2, Arrays.asList("x", "y")) );}可以通过提供其完全限定方法名来引用外部static工厂方法,如以下示例所示。
package example;
import java.util.stream.Stream;
import org.junit.jupiter.params.ParameterizedTest;import org.junit.jupiter.params.provider.MethodSource;
class ExternalMethodSourceDemo {
    @ParameterizedTest    @MethodSource("example.StringsProviders#tinyStrings")    void testWithExternalMethodSource(String tinyString) {        // test with tiny string    }}
class StringsProviders {
static Stream<String> tinyStrings() { return Stream.of(".", "oo", "OOO"); }}工厂方法可以声明参数,这些参数将由已注册的ParameterResolver扩展API实现提供。在下面的示例中,工厂方法通过其名称引用,因为测试类中只有一个这样的方法。如果有多个同名的本地方法,也可以提供参数来区分它们——例如@MethodSource("factoryMethod()")或@MethodSource("factoryMethod(java.lang.String)")。或者,工厂方法可以通过其完全限定的方法名称引用,例如@MethodSource("example.MyTests#factoryMethod(java.lang.String)")。
@RegisterExtensionstatic final IntegerResolver integerResolver = new IntegerResolver();
@ParameterizedTest@MethodSource("factoryMethodWithArguments")void testWithFactoryMethodWithArguments(String argument) {    assertTrue(argument.startsWith("2"));}
static Stream<Arguments> factoryMethodWithArguments(int quantity) {    return Stream.of(            arguments(quantity + " apples"),            arguments(quantity + " lemons")    );}
static class IntegerResolver implements ParameterResolver {
    @Override    public boolean supportsParameter(ParameterContext parameterContext,            ExtensionContext extensionContext) {
        return parameterContext.getParameter().getType() == int.class;    }
    @Override    public Object resolveParameter(ParameterContext parameterContext,            ExtensionContext extensionContext) {
        return 2;    }
}
@CsvSource
@CsvSource允许您将参数列表表示为逗号分隔的值(即CSVString字面量)。通过@CsvSource中的value属性提供的每个字符串都代表一条CSV记录,并导致一次参数化测试调用。第一条记录可以选择性地用于提供CSV标头(有关详细信息和示例,请参阅useHeadersInDisplayName属性的Javadoc)。
@ParameterizedTest@CsvSource({ "apple, 1", "banana, 2", "'lemon, lime', 0xF1", "strawberry, 700_000"})void testWithCsvSource(String fruit, int rank) { assertNotNull(fruit); assertNotEquals(0, rank);}默认分隔符是逗号(,),但您可以通过设置delimiter属性来使用其他字符。或者,delimiterString属性允许您使用字符串分隔符代替单个字符。但是,这两个分隔符属性不能同时设置。
默认情况下,@CsvSource使用单引号(')作为其引号字符,但可以通过quoteCharacter属性进行更改。请参见上例和下表中的'lemon, lime'值。除非设置了emptyValue属性,否则空的引号值('')会导致空的String;而完全为空的值将被解释为null引用。通过指定一个或多个nullValues,可以将自定义值解释为null引用(请参见下表中的NIL示例)。如果null引用的目标类型是基本类型,则会抛出ArgumentConversionException。
除引号内的字符串外,默认情况下,CSV列中的开头和末尾空格会被删除。可以通过将ignoreLeadingAndTrailingWhitespace属性设置为true来更改此行为。
| 示例输入 | 结果参数列表 |
|---|---|
@CsvSource({ "apple, banana" }) | "apple", "banana" |
@CsvSource({ "apple, 'lemon, lime'" }) | "apple", "lemon, lime" |
@CsvSource({ "apple, ''" }) | "apple", "" |
@CsvSource({ "apple, " }) | "apple", null |
@CsvSource(value = { "apple, banana, NIL" }, nullValues = "NIL") | "apple", "banana", null |
@CsvSource(value = { " apple , banana" }, ignoreLeadingAndTrailingWhitespace = false) | " apple ", " banana" |
如果您使用的编程语言支持文本块(例如Java SE 15或更高版本),您也可以使用@CsvSource的textBlock属性。文本块中的每条记录都代表一条CSV记录,并会导致一次参数化测试调用。第一条记录可以选择性地用于提供CSV标头,方法是将useHeadersInDisplayName属性设置为true,如下例所示。
使用文本块,可以按如下方式实现前面的示例。
@ParameterizedTest(name = "[{index}] {arguments}")@CsvSource(useHeadersInDisplayName = true, textBlock = """ FRUIT, RANK apple, 1 banana, 2 'lemon, lime', 0xF1 strawberry, 700_000 """)void testWithCsvSource(String fruit, int rank) { // ...}上一个示例的生成的显示名称包括CSV标题名称。
[1] FRUIT = apple, RANK = 1[2] FRUIT = banana, RANK = 2[3] FRUIT = lemon, lime, RANK = 0xF1[4] FRUIT = strawberry, RANK = 700_000与通过value属性提供的CSV记录不同,文本块可以包含注解。任何以#符号开头的行都将被视为注解并被忽略。但请注意,#符号必须是行中的第一个字符,且没有任何前导空格。因此,建议将结束文本块分隔符(""")放置在最后一行输入的末尾或下一行,并与其余输入左对齐(如下例所示,该示例演示了与表格类似的格式)。
@ParameterizedTest@CsvSource(delimiter = '|', quoteCharacter = '"', textBlock = """ #----------------------------- # FRUIT | RANK #----------------------------- apple | 1 #----------------------------- banana | 2 #----------------------------- "lemon lime" | 0xF1 #----------------------------- strawberry | 700_000 #----------------------------- """)void testWithCsvSource(String fruit, int rank) { // ...}@CsvFileSource
@CsvFileSource允许您使用类路径或本地文件系统中的逗号分隔值(CSV)文件。CSV文件中的每条记录都会导致一次参数化测试调用。第一条记录可以选择性地用于提供CSV标头。您可以通过numLinesToSkip属性指示JUnit忽略标头。如果您希望在显示名称中使用标头,可以将useHeadersInDisplayName属性设置为true。以下示例演示了numLinesToSkip和useHeadersInDisplayName的用法。
默认分隔符是逗号(,),但您可以通过设置delimiter属性来使用其他字符。或者,delimiterString属性允许您使用字符串分隔符代替单个字符。但是,这两个分隔符属性不能同时设置。
@ParameterizedTest@CsvFileSource(resources = "/two-column.csv", numLinesToSkip = 1)void testWithCsvFileSourceFromClasspath(String country, int reference) {    assertNotNull(country);    assertNotEquals(0, reference);}
@ParameterizedTest@CsvFileSource(files = "src/test/resources/two-column.csv", numLinesToSkip = 1)void testWithCsvFileSourceFromFile(String country, int reference) {    assertNotNull(country);    assertNotEquals(0, reference);}
@ParameterizedTest(name = "[{index}] {arguments}")@CsvFileSource(resources = "/two-column.csv", useHeadersInDisplayName = true)void testWithCsvFileSourceAndHeaders(String country, int reference) { assertNotNull(country); assertNotEquals(0, reference);}COUNTRY, REFERENCESweden, 1Poland, 2"United States of America", 3France, 700_000以下清单显示了上述前两个参数化测试方法生成的显示名称。
[1] country=Sweden, reference=1[2] country=Poland, reference=2[3] country=United States of America, reference=3[4] country=France, reference=700_000以下清单显示了使用CSV标头名称的上述最后一个参数化测试方法生成的显示名称。
[1] COUNTRY = Sweden, REFERENCE = 1[2] COUNTRY = Poland, REFERENCE = 2[3] COUNTRY = United States of America, REFERENCE = 3[4] COUNTRY = France, REFERENCE = 700_000与@CsvSource中使用的默认语法相反,@CsvFileSource默认使用双引号(")作为引号字符,但可以通过quoteCharacter属性进行更改。请参见上例中的"United States of America"值。除非设置了emptyValue属性,否则空的引号值("")会导致空String;而完全空的值将被解释为null引用。通过指定一个或多个nullValues,可以将自定义值解释为null引用。如果null引用的目标类型是基本类型,则会抛出ArgumentConversionException。
除引号内的字符串外,默认情况下,CSV列中的开头和末尾空格会被删除。可以通过将ignoreLeadingAndTrailingWhitespace属性设置为true来更改此行为。
@ArgumentsSource
@ArgumentsSource可用于指定自定义、可重复使用的ArgumentsProvider。请注意,ArgumentsProvider的实现必须声明为顶级类或static嵌套类。
@ParameterizedTest@ArgumentsSource(MyArgumentsProvider.class)void testWithArgumentsSource(String argument) { assertNotNull(argument);}public class MyArgumentsProvider implements ArgumentsProvider {
@Override public Stream<? extends Arguments> provideArguments(ExtensionContext context) { return Stream.of("apple", "banana").map(Arguments::of); }}如果您希望实现一个也使用注解的自定义ArgumentsProvider(如ValueArgumentsProvider或CsvArgumentsProvider等内置提供程序),您可以扩展AnnotationBasedArgumentsProvider类。
2.16.4 参数转换
放宽转换
JUnit Jupiter支持对提供给@ParameterizedTest的参数进行放宽基本转换。例如,使用@ValueSource(ints = { 1, 2, 3 })注解的参数化测试可以声明为不仅接受int类型的参数,还可以接受long、float或double类型的参数。
隐式转换
为了支持@CsvSource之类的用例,JUnit Jupiter`提供了许多内置的隐式类型转换器。转换过程取决于每个方法参数的声明类型。
例如,如果@ParameterizedTest声明了一个TimeUnit类型的参数,并且声明源提供的实际类型是String,则该字符串将自动转换为相应的TimeUnit枚举常量。
@ParameterizedTest@ValueSource(strings = "SECONDS")void testWithImplicitArgumentConversion(ChronoUnit argument) { assertNotNull(argument.name());}String实例被隐式转换为以下目标类型。
| 目标类型 | 示例 |
|---|---|
boolean/Boolean | "true" → true(仅接受值”true”或”false”,不区分大小写) |
byte/Byte | "15"、"0xF"或"017" → (byte) 15 |
char/Character | "o" → 'o' |
short/Short | "15"、"0xF"或"017" → (short) 15 |
int/Integer | "15"、"0xF"或"017" → 15 |
long/Long | "15"、"0xF"或"017" → 15L |
float/Float | "1.0" → 1.0f |
double/Double | "1.0" → 1.0d |
Enum子类 | "SECONDS" → TimeUnit.SECONDS |
java.io.File | "/path/to/file" → new File("/path/to/file") |
java.lang.Class | "java.lang.Integer" → java.lang.Integer.class(用$表示嵌套类,如"java.lang.Thread$State") |
java.lang.Class | "byte" → byte.class(支持基本类型) |
java.lang.Class | "char[]" → char[].class(支持数组类型) |
java.math.BigDecimal | "123.456e789" → new BigDecimal("123.456e789") |
java.math.BigInteger | "1234567890123456789" → new BigInteger("1234567890123456789") |
java.net.URI | "https://junit.org/" → URI.create("https://junit.org/") |
java.net.URL | "https://junit.org/" → URI.create("https://junit.org/").toURL() |
java.nio.charset.Charset | "UTF-8" → Charset.forName("UTF-8") |
java.nio.file.Path | "/path/to/file" → Paths.get("/path/to/file") |
java.time.Duration | "PT3S" → Duration.ofSeconds(3) |
java.time.Instant | "1970-01-01T00:00:00Z" → Instant.ofEpochMilli(0) |
java.time.LocalDateTime | "2017-03-14T12:34:56.789" → LocalDateTime.of(2017, 3, 14, 12, 34, 56, 789_000_000) |
java.time.LocalDate | "2017-03-14" → LocalDate.of(2017, 3, 14) |
java.time.LocalTime | "12:34:56.789" → LocalTime.of(12, 34, 56, 789_000_000) |
java.time.MonthDay | "--03-14" → MonthDay.of(3, 14) |
java.time.OffsetDateTime | "2017-03-14T12:34:56.789Z" → OffsetDateTime.of(2017, 3, 14, 12, 34, 56, 789_000_000, ZoneOffset.UTC) |
java.time.OffsetTime | "12:34:56.789Z" → OffsetTime.of(12, 34, 56, 789_000_000, ZoneOffset.UTC) |
java.time.Period | "P2M6D" → Period.of(0, 2, 6) |
java.time.YearMonth | "2017-03" → YearMonth.of(2017, 3) |
java.time.Year | "2017" → Year.of(2017) |
java.time.ZonedDateTime | "2017-03-14T12:34:56.789Z" → ZonedDateTime.of(2017, 3, 14, 12, 34, 56, 789_000_000, ZoneOffset.UTC) |
java.time.ZoneId | "Europe/Berlin" → ZoneId.of("Europe/Berlin") |
java.time.ZoneOffset | "+02:30" → ZoneOffset.ofHoursMinutes(2, 30) |
java.util.Currency | "JPY" → Currency.getInstance("JPY") |
java.util.Locale | "en" → new Locale("en") |
java.util.UUID | "d043e930-7b3b-48e3-bdbe-5a3ccfb833db" → UUID.fromString("d043e930-7b3b-48e3-bdbe-5a3ccfb833db") |
后备字符串到对象的转换
除了从String到上表列出的目标类型的隐式转换之外,如果目标类型声明了一个合适的工厂方法或一个工厂构造器(如下所定义),JUnit Jupiter还提供了一种后备机制,用于从字符串自动转换为给定的目标类型。
- 工厂方法:在目标类型中声明的非私有
static方法,该方法接受单个String参数并返回目标类型的实例。方法的名称可以是任意的,不需要遵循任何特定约定。 - 工厂构造器:目标类型中接受单个
String参数的非私有构造器。请注意,目标类型必须声明为顶级类或static嵌套类。
例如,在下面的@ParameterizedTest方法中,将通过调用Book.fromTitle(String)工厂方法并传递"42 Cats"作为书名来创建Book参数。
@ParameterizedTest@ValueSource(strings = "42 Cats")void testWithImplicitFallbackArgumentConversion(Book book) { assertEquals("42 Cats", book.getTitle());}public class Book {
private final String title;
private Book(String title) { this.title = title; }
public static Book fromTitle(String title) { return new Book(title); }
public String getTitle() { return this.title; }}显式转换
您可以使用@ConvertWith注解显式指定用于特定参数的ArgumentConverter,而不是依赖隐式参数转换,如下例所示。请注意,ArgumentConverter的实现必须声明为顶级类或static嵌套类。
@ParameterizedTest@EnumSource(ChronoUnit.class)void testWithExplicitArgumentConversion(        @ConvertWith(ToStringArgumentConverter.class) String argument) {
    assertNotNull(ChronoUnit.valueOf(argument));}
public class ToStringArgumentConverter extends SimpleArgumentConverter {
@Override protected Object convert(Object source, Class<?> targetType) { assertEquals(String.class, targetType, "Can only convert to String"); if (source instanceof Enum<?>) { return ((Enum<?>) source).name(); } return String.valueOf(source); }}如果转换器仅用于将一种类型转换为另一种类型,则可以扩展TypedArgumentConverter以避免样板类型检查。
public class ToLengthArgumentConverter extends TypedArgumentConverter<String, Integer> {
    protected ToLengthArgumentConverter() {        super(String.class, Integer.class);    }
    @Override    protected Integer convert(String source) {        return (source != null ? source.length() : 0);    }
}显式参数转换器旨在由测试和扩展作者实现。因此,junit-jupiter-params仅提供一个显式参数转换器,该转换器也可用作参考实现:JavaTimeArgumentConverter。它通过组合注解JavaTimeConversionPattern来使用。
@ParameterizedTest@ValueSource(strings = { "01.01.2017", "31.12.2017" })void testWithExplicitJavaTimeConverter(        @JavaTimeConversionPattern("dd.MM.yyyy") LocalDate argument) {
assertEquals(2017, argument.getYear());}如果您希望实现一个也使用注解的自定义ArgumentConverter(如JavaTimeArgumentConverter),您可以扩展AnnotationBasedArgumentConverter类。
2.16.5 参数聚合
默认情况下,提供给@ParameterizedTest方法的每个参数都对应一个方法参数。因此,预期提供大量参数的参数源可能会导致方法签名过大。
在这种情况下,可以使用ArgumentsAccessor代替多个参数。使用此API,您可以通过传递给测试方法的单个参数访问提供的参数。此外,还支持类型转换,如隐式转换中所述。
此外,您可以使用ArgumentsAccessor.getInvocationIndex()检索当前测试调用索引。
@ParameterizedTest@CsvSource({    "Jane, Doe, F, 1990-05-20",    "John, Doe, M, 1990-10-22"})void testWithArgumentsAccessor(ArgumentsAccessor arguments) {    Person person = new Person(arguments.getString(0),                               arguments.getString(1),                               arguments.get(2, Gender.class),                               arguments.get(3, LocalDate.class));
if (person.getFirstName().equals("Jane")) { assertEquals(Gender.F, person.getGender()); } else { assertEquals(Gender.M, person.getGender()); } assertEquals("Doe", person.getLastName()); assertEquals(1990, person.getDateOfBirth().getYear());}ArgumentsAccessor的实例会自动注入到ArgumentsAccessor类型的任何参数中。
自定义聚合
除了使用ArgumentsAccessor直接访问@ParameterizedTest方法的参数之外,JUnit Jupiter还支持使用自定义的可重用聚合器。
要使用自定义聚合器,请实现ArgumentsAggregator接口并通过@ParameterizedTest方法中兼容参数上的@AggregateWith注解对其进行注册。然后,在调用参数化测试时,聚合结果将作为相应参数的参数提供。请注意,ArgumentsAggregator的实现必须声明为顶级类或static嵌套类。
@ParameterizedTest@CsvSource({ "Jane, Doe, F, 1990-05-20", "John, Doe, M, 1990-10-22"})void testWithArgumentsAggregator(@AggregateWith(PersonAggregator.class) Person person) { // perform assertions against person}public class PersonAggregator implements ArgumentsAggregator { @Override public Person aggregateArguments(ArgumentsAccessor arguments, ParameterContext context) { return new Person(arguments.getString(0), arguments.getString(1), arguments.get(2, Gender.class), arguments.get(3, LocalDate.class)); }}如果您发现自己在代码库中反复为多个参数化测试方法声明@AggregateWith(MyTypeAggregator.class),您可能希望创建一个自定义组合注解,例如使用@AggregateWith(MyTypeAggregator.class)进行元注解的@CsvToMyType。以下示例使用自定义@CsvToPerson注解演示了此操作。
@ParameterizedTest@CsvSource({ "Jane, Doe, F, 1990-05-20", "John, Doe, M, 1990-10-22"})void testWithCustomAggregatorAnnotation(@CsvToPerson Person person) { // perform assertions against person}@Retention(RetentionPolicy.RUNTIME)@Target(ElementType.PARAMETER)@AggregateWith(PersonAggregator.class)public @interface CsvToPerson {}2.16.6 自定义显示名称
默认情况下,参数化测试调用的显示名称包含调用索引和该特定调用的所有参数的String表示形式。如果字节码中存在参数名称(对于Java,必须使用-parameters编译器标志编译测试代码),则每个参数名称前面都有参数名称(除非该参数只能通过ArgumentsAccessor或ArgumentAggregator获得)。
但是,您可以通过@ParameterizedTest注解的name属性自定义调用显示名称,如以下示例所示。
@DisplayName("Display name of container")@ParameterizedTest(name = "{index} ==> the rank of ''{0}'' is {1}")@CsvSource({ "apple, 1", "banana, 2", "'lemon, lime', 3" })void testWithCustomDisplayNames(String fruit, int rank) {}当使用ConsoleLauncher执行上述方法时,您将看到类似以下内容的输出。
Display name of container ✔├─ 1 ==> the rank of 'apple' is 1 ✔├─ 2 ==> the rank of 'banana' is 2 ✔└─ 3 ==> the rank of 'lemon, lime' is 3 ✔请注意,name是MessageFormat模式。因此,单引号(')需要表示为双单引号('')才能显示。
自定义显示名称支持以下占位符。
| 占位符 | 描述 |
|---|---|
{displayName} | 方法的显示名称 |
{index} | 当前调用的索引(从1开始) |
{arguments} | 完整的、逗号分隔的参数列表 |
{argumentsWithNames} | 完整的、逗号分隔的参数列表,其中包含参数名称 |
{0}、{1}、…… | 单独的参数 |
使用@MethodSource或@ArgumentsSource时,您可以使用Named API为参数提供自定义名称。如果参数包含在调用显示名称中,则将使用自定义名称,如下例所示。
@DisplayName("A parameterized test with named arguments")@ParameterizedTest(name = "{index}: {0}")@MethodSource("namedArguments")void testWithNamedArguments(File file) {}
static Stream<Arguments> namedArguments() {    return Stream.of(        arguments(named("An important file", new File("path1"))),        arguments(named("Another file", new File("path2")))    );}
A parameterized test with named arguments ✔├─ 1: An important file ✔└─ 2: Another file ✔如果您想为项目中的所有参数化测试设置默认名称模式,您可以在junit-platform.properties文件中声明junit.jupiter.params.displayname.default配置参数,如下例所示(有关其他选项,请参阅配置参数)。
junit.jupiter.params.displayname.default = {index}参数化测试的显示名称根据以下优先规则确定:
@ParameterizedTest中的name属性(如果存在)junit.jupiter.params.displayname.default配置参数的值(如果存在)@ParameterizedTest中定义的DEFAULT_DISPLAY_NAME常量
2.16.7 生命周期和互操作性
参数化测试的每次调用都与常规@Test方法具有相同的生命周期。例如,@BeforeEach方法将在每次调用之前执行。与动态测试类似,调用将逐个出现在IDE的测试树中。您可以随意在同一个测试类中混合使用常规@Test方法和@ParameterizedTest方法。
您可以将ParameterResolver扩展与@ParameterizedTest方法结合使用。但是,由参数源解析的方法参数需要位于参数列表的首位。由于测试类可能包含常规测试以及具有不同参数列表的参数化测试,因此不会为生命周期方法(例如@BeforeEach)和测试类构造器解析来自参数源的值。
2.17 测试模板
@TestTemplate方法不是常规测试用例,而是测试用例的模板。因此,它被设计为根据已注册提供程序返回的调用上下文数量多次调用。因此,它必须与已注册的TestTemplateInvocationContextProvider扩展一起使用。每次调用测试模板方法的行为都类似于执行常规@Test方法,并完全支持相同的生命周期回调和扩展。请参阅为测试模板提供调用上下文以获取使用示例。
2.18 动态测试
JUnit Jupiter在注解中描述的标准@Test注解与JUnit 4中的@Test注解非常相似。两者都描述了实现测试用例的方法。这些测试用例是静态的,因为它们在编译时完全指定,并且它们的行为不会因运行时发生的任何事情而改变。假设提供了一种基本的动态行为形式,但其表达能力故意受到限制。
除了这些标准测试之外,JUnit Jupiter还引入了一种全新的测试编程模型。这种新测试是一种动态测试,由使用@TestFactory注解的工厂方法在运行时生成。
与@Test方法相比,@TestFactory方法本身并不是测试用例,而是测试用例的工厂。因此,动态测试是工厂的产物。从技术上讲,@TestFactory方法必须返回单个DynamicNode或Stream、Collection、Iterable、Iterator或DynamicNode实例数组。DynamicNode的可实例化子类是DynamicContainer和DynamicTest。DynamicContainer实例由显示名称和动态子节点列表组成,支持创建任意嵌套的动态节点层次结构。DynamicTest实例将延迟执行,从而支持动态甚至非确定性的测试用例生成。
@TestFactory返回的任何Stream都将通过调用stream.close()正确关闭,从而可以安全地使用Files.lines()等资源。
与@Test方法一样,@TestFactory方法不能是private的或static的,并且可以选择声明要由ParameterResolvers解析的参数。
DynamicTest是在运行时生成的测试用例。它由显示名称和Executable组成。Executable是@FunctionalInterface,这意味着动态测试的实现可以作为lambda表达式或方法引用提供。
从JUnit Jupiter 5.10.3开始,动态测试必须始终通过工厂方法创建;但是,这可能会在以后的版本中通过注册功能进行补充。
2.18.1 动态测试示例
下面的DynamicTestsDemo类演示了测试工厂和动态测试的几个示例。
第一个方法返回了无效的返回类型。由于在编译时无法检测到无效的返回类型,因此在运行时检测到时会抛出JUnitException。
接下来的六种方法演示了如何生成DynamicTest实例的Collection、Iterable、Iterator、数组或Stream。这些示例中的大多数并没有真正展示动态行为,而只是从原则上演示了支持的返回类型。但是,dynamicTestsFromStream()和dynamicTestsFromIntStream()演示了如何为给定的一组字符串或一系列输入数字生成动态测试。
下一个方法本质上是真正的动态方法。generateRandomNumberOfTests()实现了一个生成随机数的Iterator、一个显示名称生成器和一个测试执行器,然后将这三个都提供给DynamicTest.stream()。尽管generateRandomNumberOfTests()的非确定性行为当然与测试可重复性相冲突,因此应谨慎使用,但它可以展示动态测试的表现力和强大功能。
下一种方法在灵活性方面与generateRandomNumberOfTests()类似;但是,dynamicTestsFromStreamFactoryMethod()通过DynamicTest.stream()工厂方法从现有Stream生成动态测试流。
为了演示目的,dynamicNodeSingleTest()方法生成单个DynamicTest而不是流,而dynamicNodeSingleContainer()方法利用DynamicContainer生成嵌套的动态测试层次结构。
import static example.util.StringUtils.isPalindrome;import static org.junit.jupiter.api.Assertions.assertEquals;import static org.junit.jupiter.api.Assertions.assertFalse;import static org.junit.jupiter.api.Assertions.assertNotNull;import static org.junit.jupiter.api.Assertions.assertTrue;import static org.junit.jupiter.api.DynamicContainer.dynamicContainer;import static org.junit.jupiter.api.DynamicTest.dynamicTest;import static org.junit.jupiter.api.Named.named;
import java.util.Arrays;import java.util.Collection;import java.util.Iterator;import java.util.List;import java.util.Random;import java.util.function.Function;import java.util.stream.IntStream;import java.util.stream.Stream;
import example.util.Calculator;
import org.junit.jupiter.api.DynamicNode;import org.junit.jupiter.api.DynamicTest;import org.junit.jupiter.api.Named;import org.junit.jupiter.api.Tag;import org.junit.jupiter.api.TestFactory;import org.junit.jupiter.api.function.ThrowingConsumer;
class DynamicTestsDemo {
    private final Calculator calculator = new Calculator();
    // This will result in a JUnitException!    @TestFactory    List<String> dynamicTestsWithInvalidReturnType() {        return Arrays.asList("Hello");    }
    @TestFactory    Collection<DynamicTest> dynamicTestsFromCollection() {        return Arrays.asList(            dynamicTest("1st dynamic test", () -> assertTrue(isPalindrome("madam"))),            dynamicTest("2nd dynamic test", () -> assertEquals(4, calculator.multiply(2, 2)))        );    }
    @TestFactory    Iterable<DynamicTest> dynamicTestsFromIterable() {        return Arrays.asList(            dynamicTest("3rd dynamic test", () -> assertTrue(isPalindrome("madam"))),            dynamicTest("4th dynamic test", () -> assertEquals(4, calculator.multiply(2, 2)))        );    }
    @TestFactory    Iterator<DynamicTest> dynamicTestsFromIterator() {        return Arrays.asList(            dynamicTest("5th dynamic test", () -> assertTrue(isPalindrome("madam"))),            dynamicTest("6th dynamic test", () -> assertEquals(4, calculator.multiply(2, 2)))        ).iterator();    }
    @TestFactory    DynamicTest[] dynamicTestsFromArray() {        return new DynamicTest[] {            dynamicTest("7th dynamic test", () -> assertTrue(isPalindrome("madam"))),            dynamicTest("8th dynamic test", () -> assertEquals(4, calculator.multiply(2, 2)))        };    }
    @TestFactory    Stream<DynamicTest> dynamicTestsFromStream() {        return Stream.of("racecar", "radar", "mom", "dad")            .map(text -> dynamicTest(text, () -> assertTrue(isPalindrome(text))));    }
    @TestFactory    Stream<DynamicTest> dynamicTestsFromIntStream() {        // Generates tests for the first 10 even integers.        return IntStream.iterate(0, n -> n + 2).limit(10)            .mapToObj(n -> dynamicTest("test" + n, () -> assertTrue(n % 2 == 0)));    }
    @TestFactory    Stream<DynamicTest> generateRandomNumberOfTestsFromIterator() {
        // Generates random positive integers between 0 and 100 until        // a number evenly divisible by 7 is encountered.        Iterator<Integer> inputGenerator = new Iterator<Integer>() {
            Random random = new Random();            int current;
            @Override            public boolean hasNext() {                current = random.nextInt(100);                return current % 7 != 0;            }
            @Override            public Integer next() {                return current;            }        };
        // Generates display names like: input:5, input:37, input:85, etc.        Function<Integer, String> displayNameGenerator = (input) -> "input:" + input;
        // Executes tests based on the current input value.        ThrowingConsumer<Integer> testExecutor = (input) -> assertTrue(input % 7 != 0);
        // Returns a stream of dynamic tests.        return DynamicTest.stream(inputGenerator, displayNameGenerator, testExecutor);    }
    @TestFactory    Stream<DynamicTest> dynamicTestsFromStreamFactoryMethod() {        // Stream of palindromes to check        Stream<String> inputStream = Stream.of("racecar", "radar", "mom", "dad");
        // Generates display names like: racecar is a palindrome        Function<String, String> displayNameGenerator = text -> text + " is a palindrome";
        // Executes tests based on the current input value.        ThrowingConsumer<String> testExecutor = text -> assertTrue(isPalindrome(text));
        // Returns a stream of dynamic tests.        return DynamicTest.stream(inputStream, displayNameGenerator, testExecutor);    }
    @TestFactory    Stream<DynamicTest> dynamicTestsFromStreamFactoryMethodWithNames() {        // Stream of palindromes to check        Stream<Named<String>> inputStream = Stream.of(                named("racecar is a palindrome", "racecar"),                named("radar is also a palindrome", "radar"),                named("mom also seems to be a palindrome", "mom"),                named("dad is yet another palindrome", "dad")            );
        // Returns a stream of dynamic tests.        return DynamicTest.stream(inputStream,            text -> assertTrue(isPalindrome(text)));    }
    @TestFactory    Stream<DynamicNode> dynamicTestsWithContainers() {        return Stream.of("A", "B", "C")            .map(input -> dynamicContainer("Container " + input, Stream.of(                dynamicTest("not null", () -> assertNotNull(input)),                dynamicContainer("properties", Stream.of(                    dynamicTest("length > 0", () -> assertTrue(input.length() > 0)),                    dynamicTest("not empty", () -> assertFalse(input.isEmpty()))                ))            )));    }
    @TestFactory    DynamicNode dynamicNodeSingleTest() {        return dynamicTest("'pop' is a palindrome", () -> assertTrue(isPalindrome("pop")));    }
    @TestFactory    DynamicNode dynamicNodeSingleContainer() {        return dynamicContainer("palindromes",            Stream.of("racecar", "radar", "mom", "dad")                .map(text -> dynamicTest(text, () -> assertTrue(isPalindrome(text)))        ));    }
}
2.18.2 动态测试的URI测试源
JUnit Platform提供了TestSource,它是测试或容器源的表示,用于通过IDE和构建工具导航到其位置。
动态测试或动态容器的TestSource可以从java.net.URI构建,该URI可以分别通过DynamicTest.dynamicTest(String, URI, Executable)或DynamicContainer.dynamicContainer(String, URI, Stream)工厂方法提供。URI将转换为以下TestSource实现之一。
ClasspathResourceSource:如果URI包含classpath模式——例如classpath:/test/foo.xml?line=20,column=2。DirectorySource:如果URI代表文件系统中存在的目录。FileSource:如果URI代表文件系统中存在的文件。MethodSource:如果URI包含method模式和完全限定方法名称(FQMN)——例如,method:org.junit.Foo#bar(java.lang.String, java.lang.String[])。请参阅DiscoverySelectors.selectMethod(String)的Javadoc以了解FQMN支持的格式。ClassSource:如果URI包含class模式和完全限定的类名——例如class:org.junit.Foo?line=42。UriSource:如果上述TestSource实现均不适用。